Virtual Private Server Hosting Guide
Virtual Private Servers are what I recommend to anyone who actually wants to build a personal site with lots of content. Make sure you're on either linux or mac.
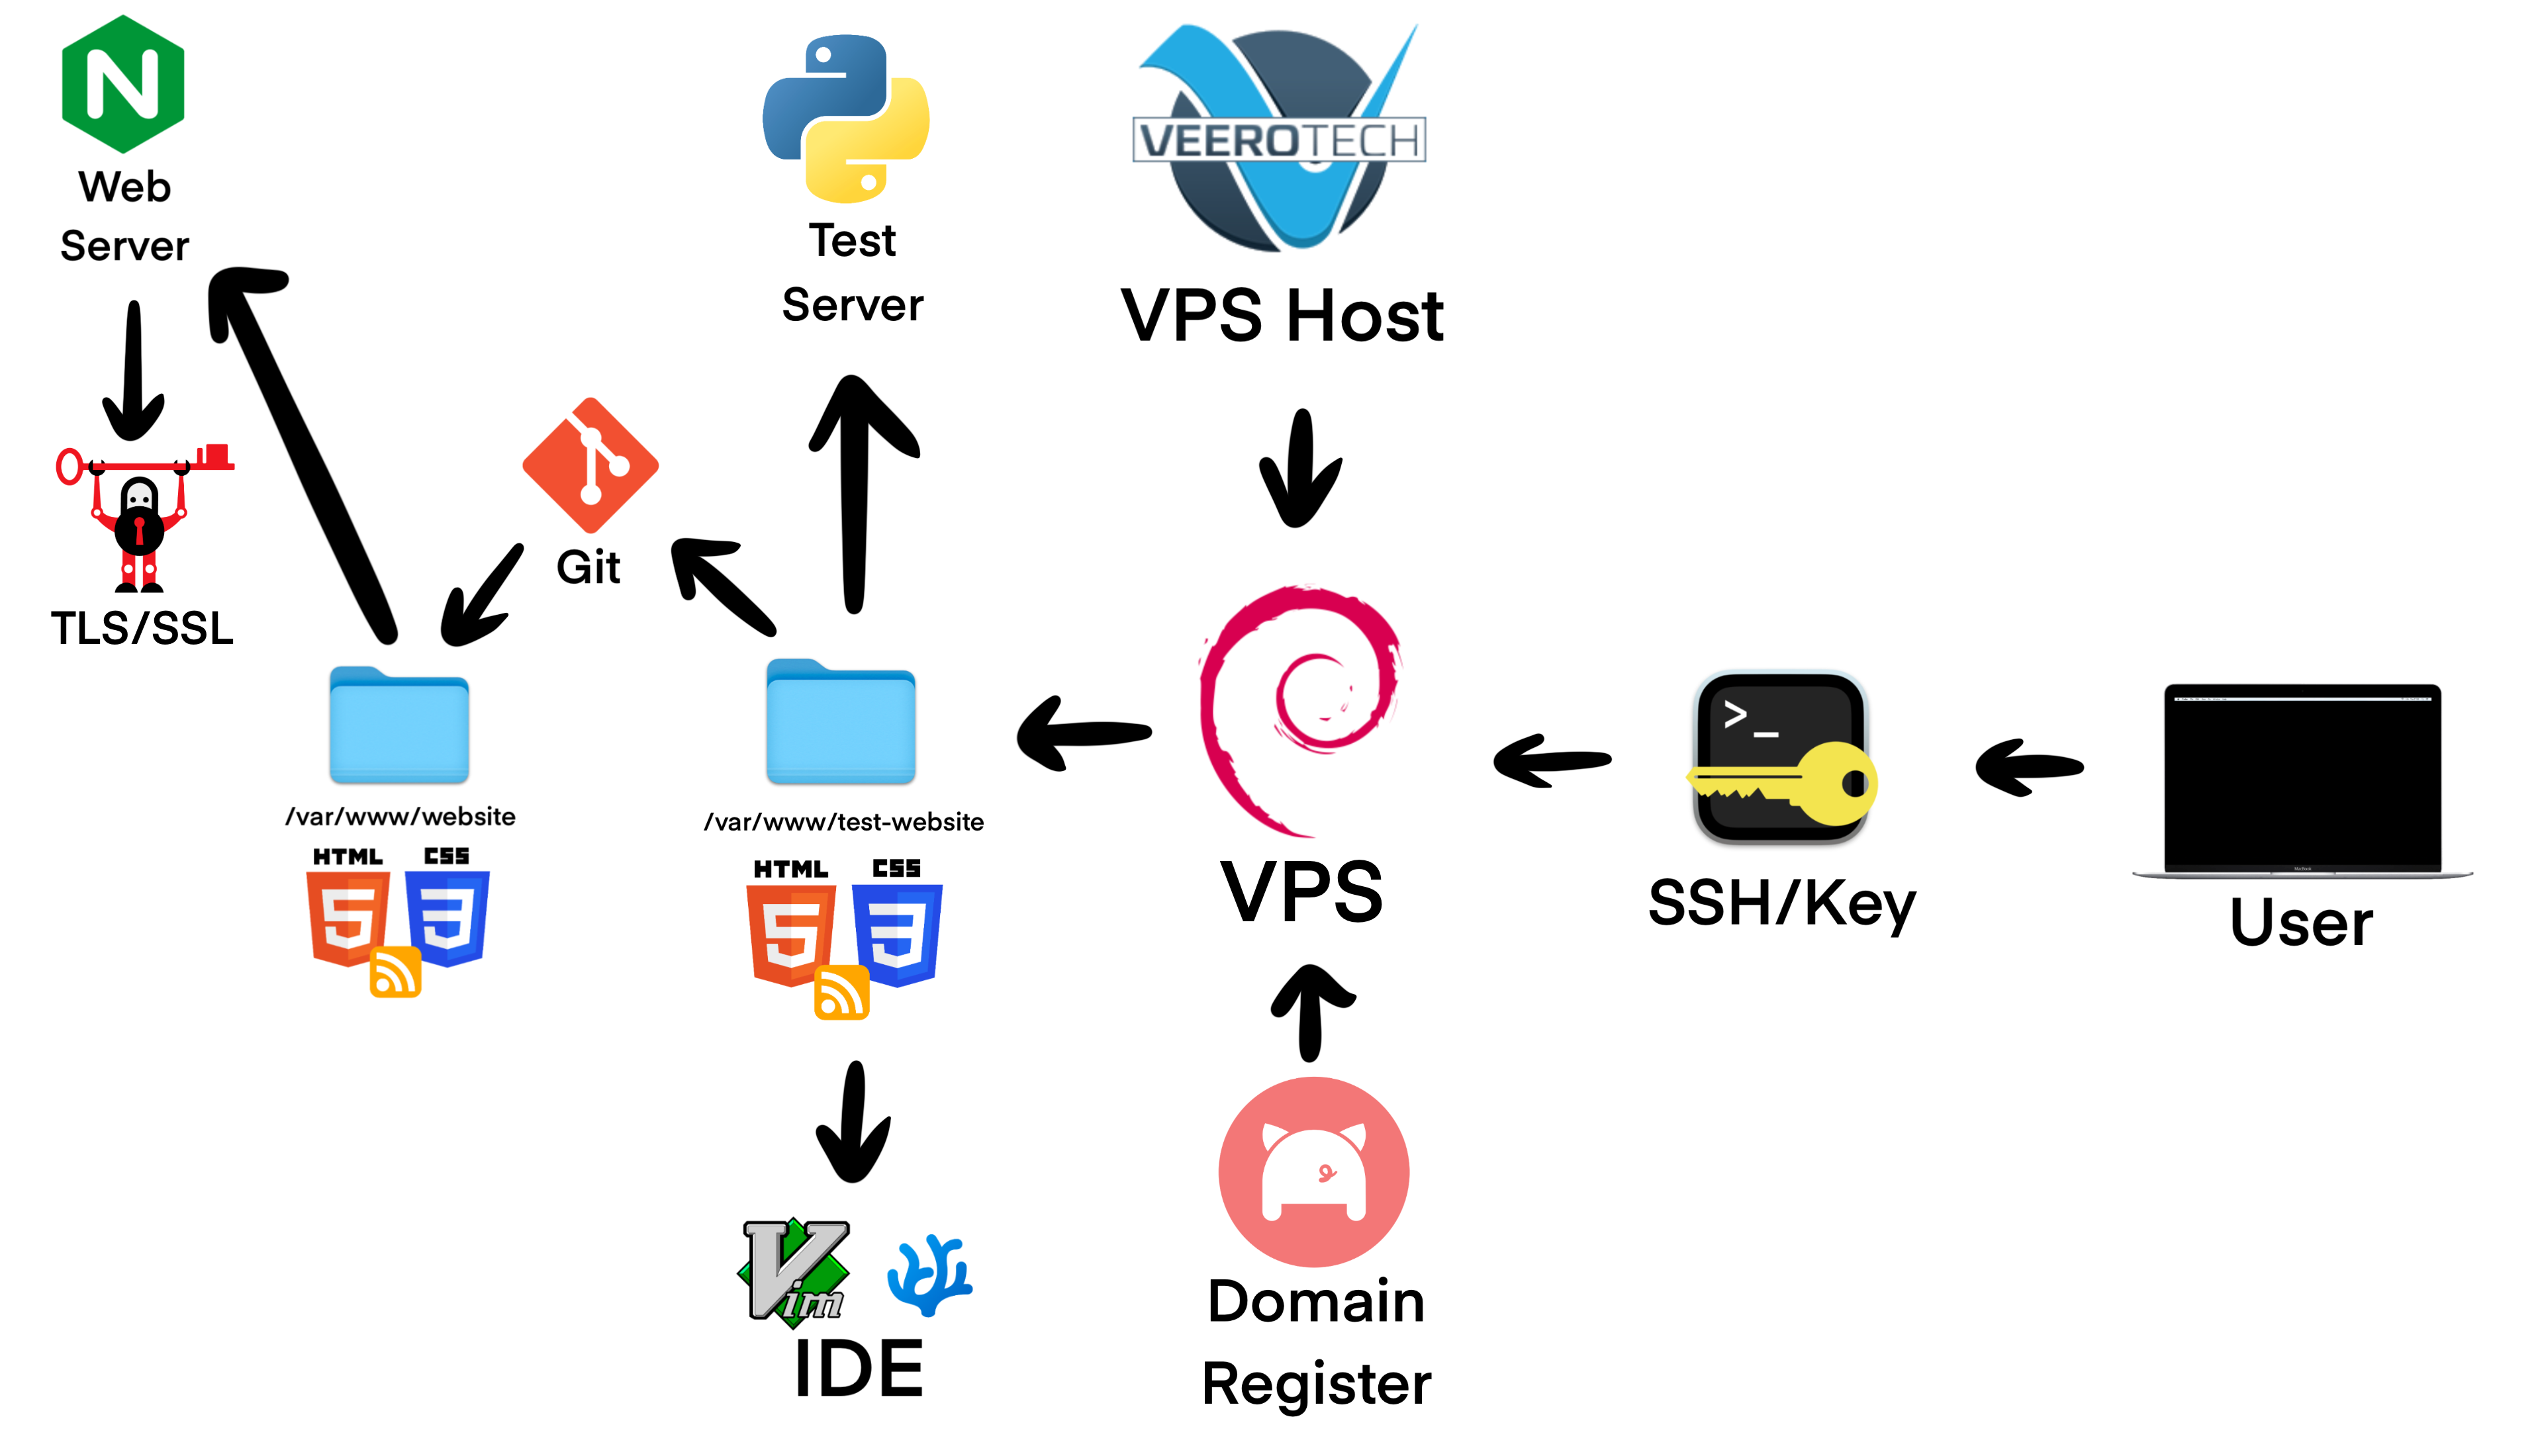
Buy A Virtual Private Server

A Virtual Private Host basically rents you a virtual private server. Without reliable secure respectable VPS hosts, the Internet wouldn't be the same. Most individual websites you see hosted on the Internet are using VPS hosts. Once you get comfortable working on virtual private servers, you'll realize just how important it is to have a reliable VPS host. A long-term reliable stable VPS host is a developers dream.
Here is list of VPS host I recommend: VeeroTech, NixiHost, A2 Hosting, DreamHost, KnownHost, Hetzner, BuyVM, Njalla Privex, GreenGeeks, OrangeWebsite, 1984 Hosting
Diversity of VPS Hosts is REALLY important for the diversity of the Internet. There are a lot of people who complain about a few social media companies taking over the Internet verse having a personal website instead, but few actually delve into the actual centralized infrastructure of the Internet. The reason why the Internet is more diverse is because we have a bunch of VPS hosts working hard to keep it that way. There are plenty of VPS hosts that are really shady and crappy, just like social media companies.
One such example is the notorious GoDaddy. GoDaddy is one of the worst companies on earth. DO NOT UNDER ANY CIRCUMSTANCES USE GODADDY!!!
Another is the infamous Newfold Digital or (EIG) Endurance International Group. They are a large web hosting conglomerate that owns and operates numerous popular web hosting brands. Basically they bought a whole bunch of web hosting companies, and made them all garbage on purpose to squeeze as much money out of their customer's as possible. Rather than delving into a long essay here on free markets, corporate monopolies and fascism, just use avoid using any listed here.
Here is a list of VPS hosts I don't recommend: GoDaddy, Bluehost, Domain.com, Web.com, WebHostFace, Vultr, Hostgator.
But don't take my word for it, everything changes with time. Do your homework. Talk to people.
Once you have picked one, it's time to sign up for one. In this tutorial I will be using VeeroTech. Now most VPS hosts either offer managed or unmanaged VPS. Managed VPS do a lot of work for you, but they're like $50 a month, while unmanaged VPS are only about $5-10 dollars a month so I will choose a unmanaged VPS.
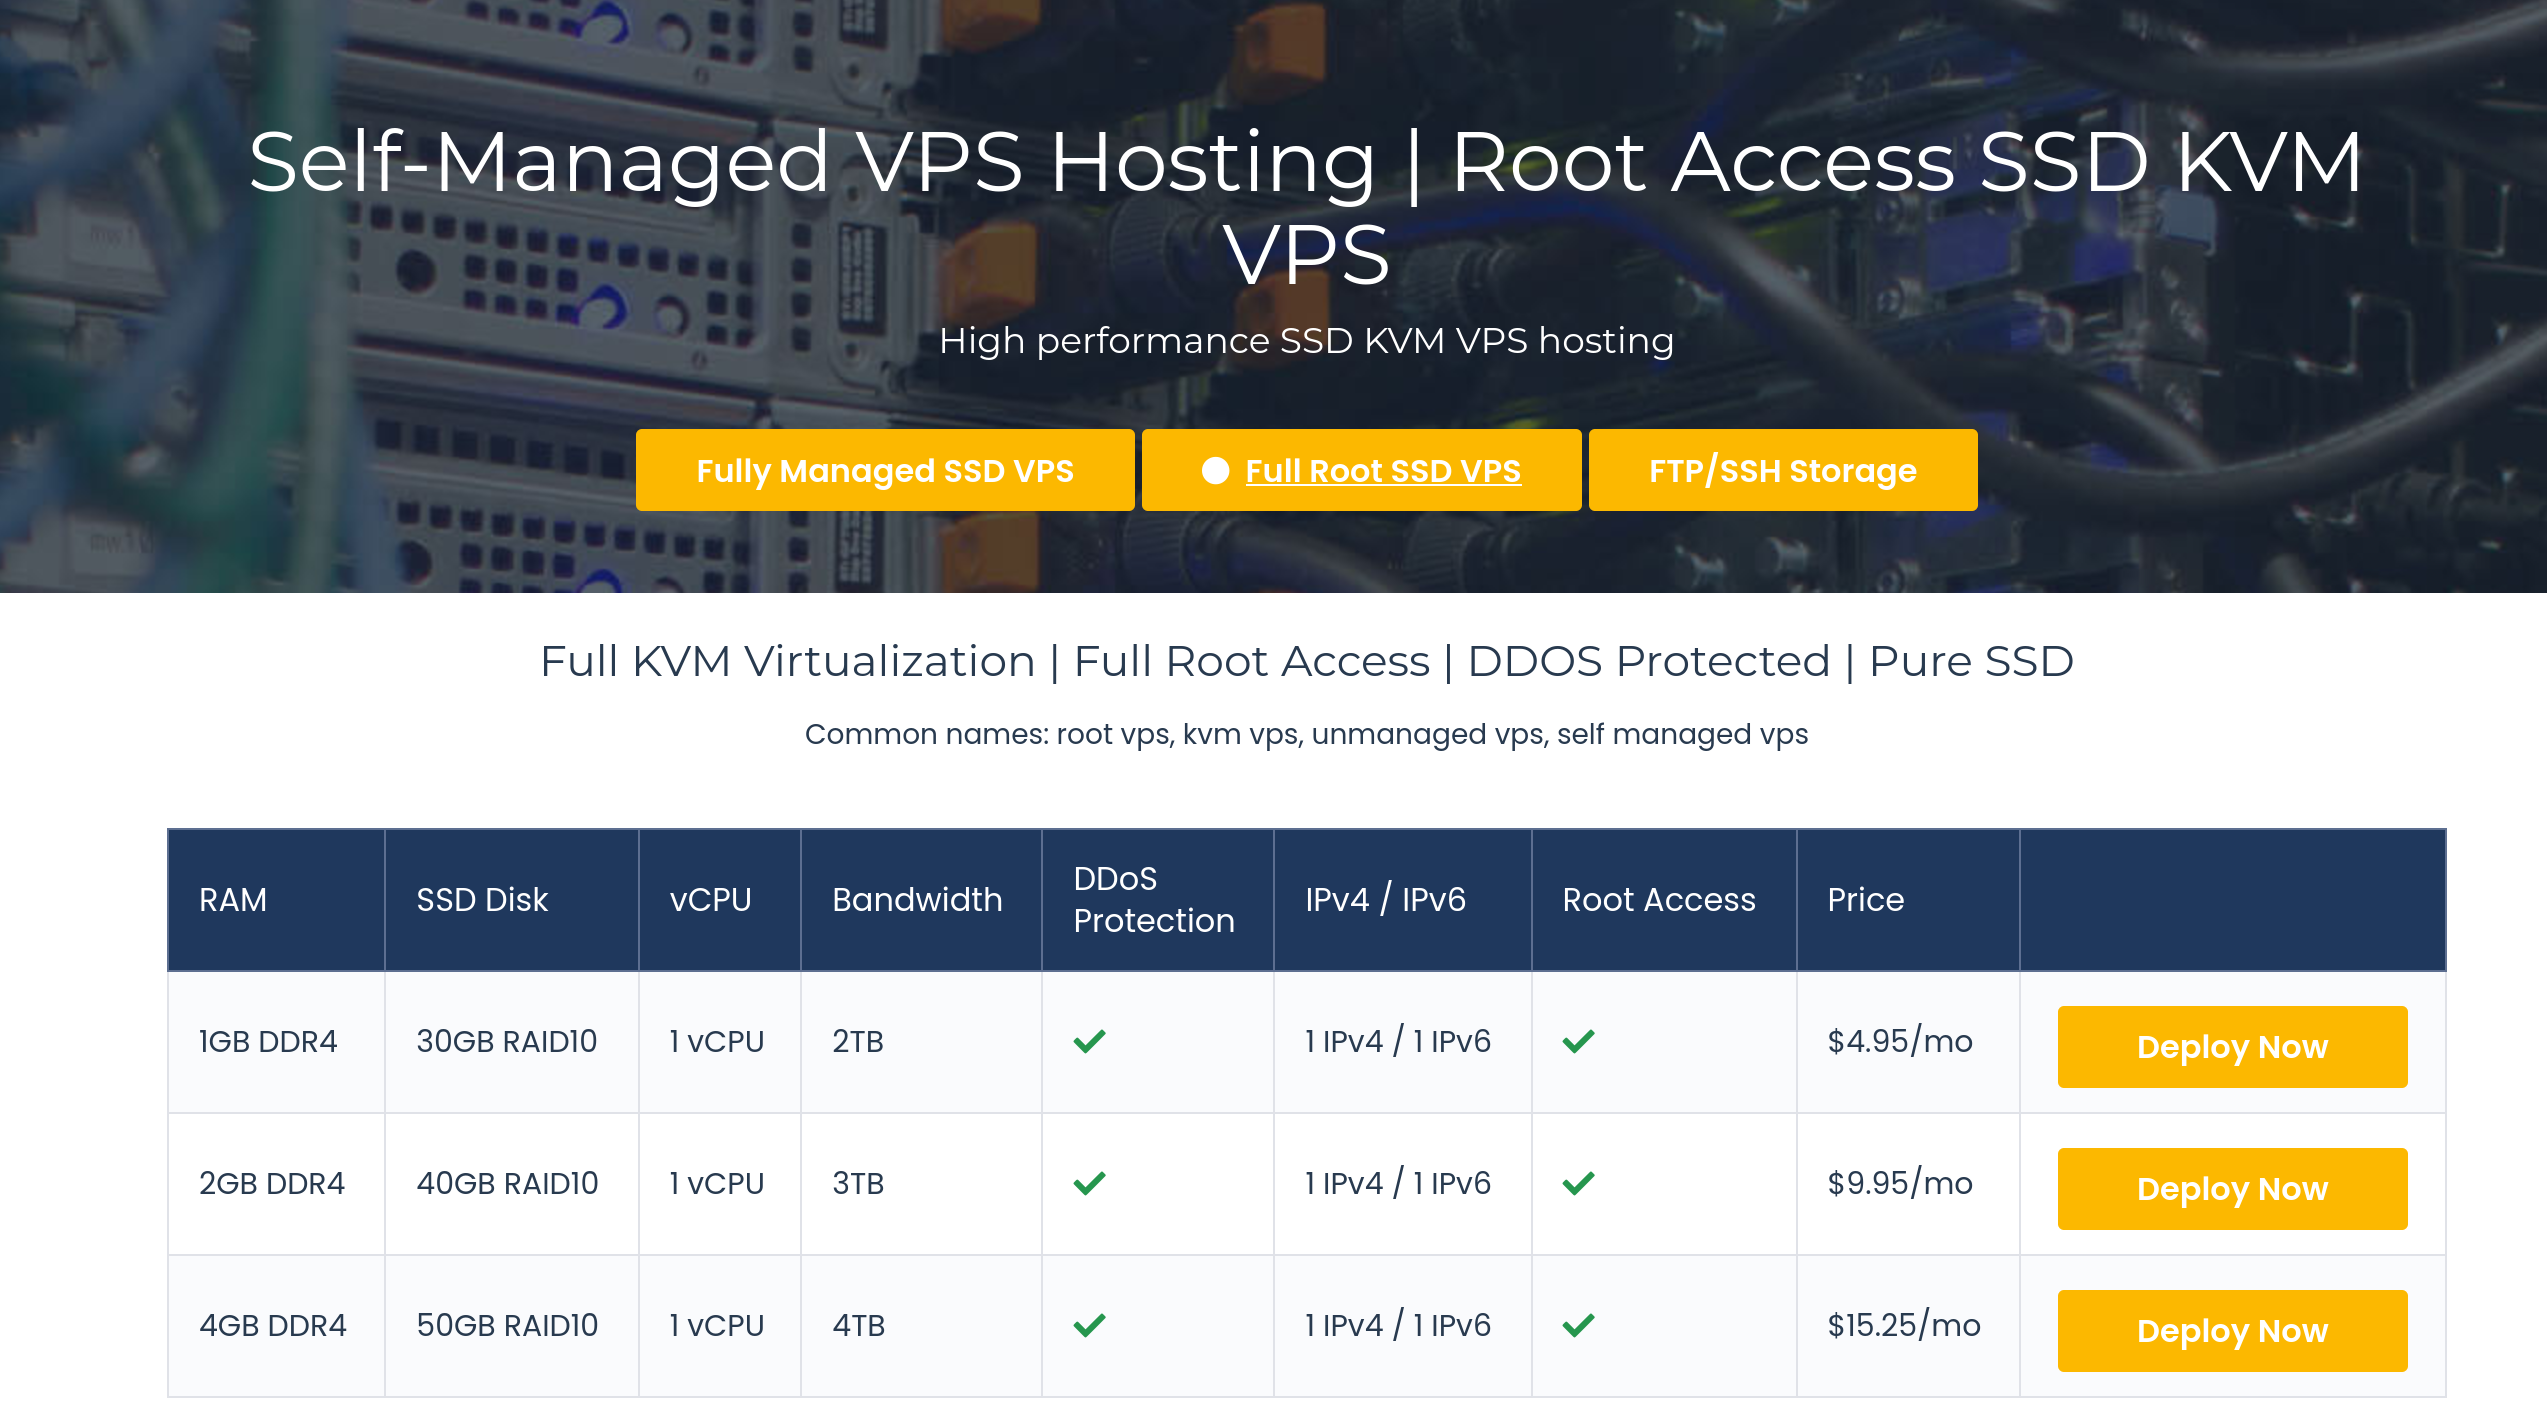
If your unmanaged vps does not offer DDoS protection you have to use cloudflare to avoid your site getting taken offline do to DDoS attacks. Most of the VPS hosts I listed should provide DDoS protection for their unmanaged servers, but do your homework. There are no alternatives to cloudflare, that aren't insanely unreasonably expensive due to network infrastructure.
When choosing a VPS, your location matters but not by a lot. If it's in your country you should be fine. The speed gains you get from choosing a closer location are not really substantial unless you are running some massive online e-commerce site.
Next make sure to choose a good linux operating system for your server. I recommend Debian 11, but you can choose whatever suits your needs.
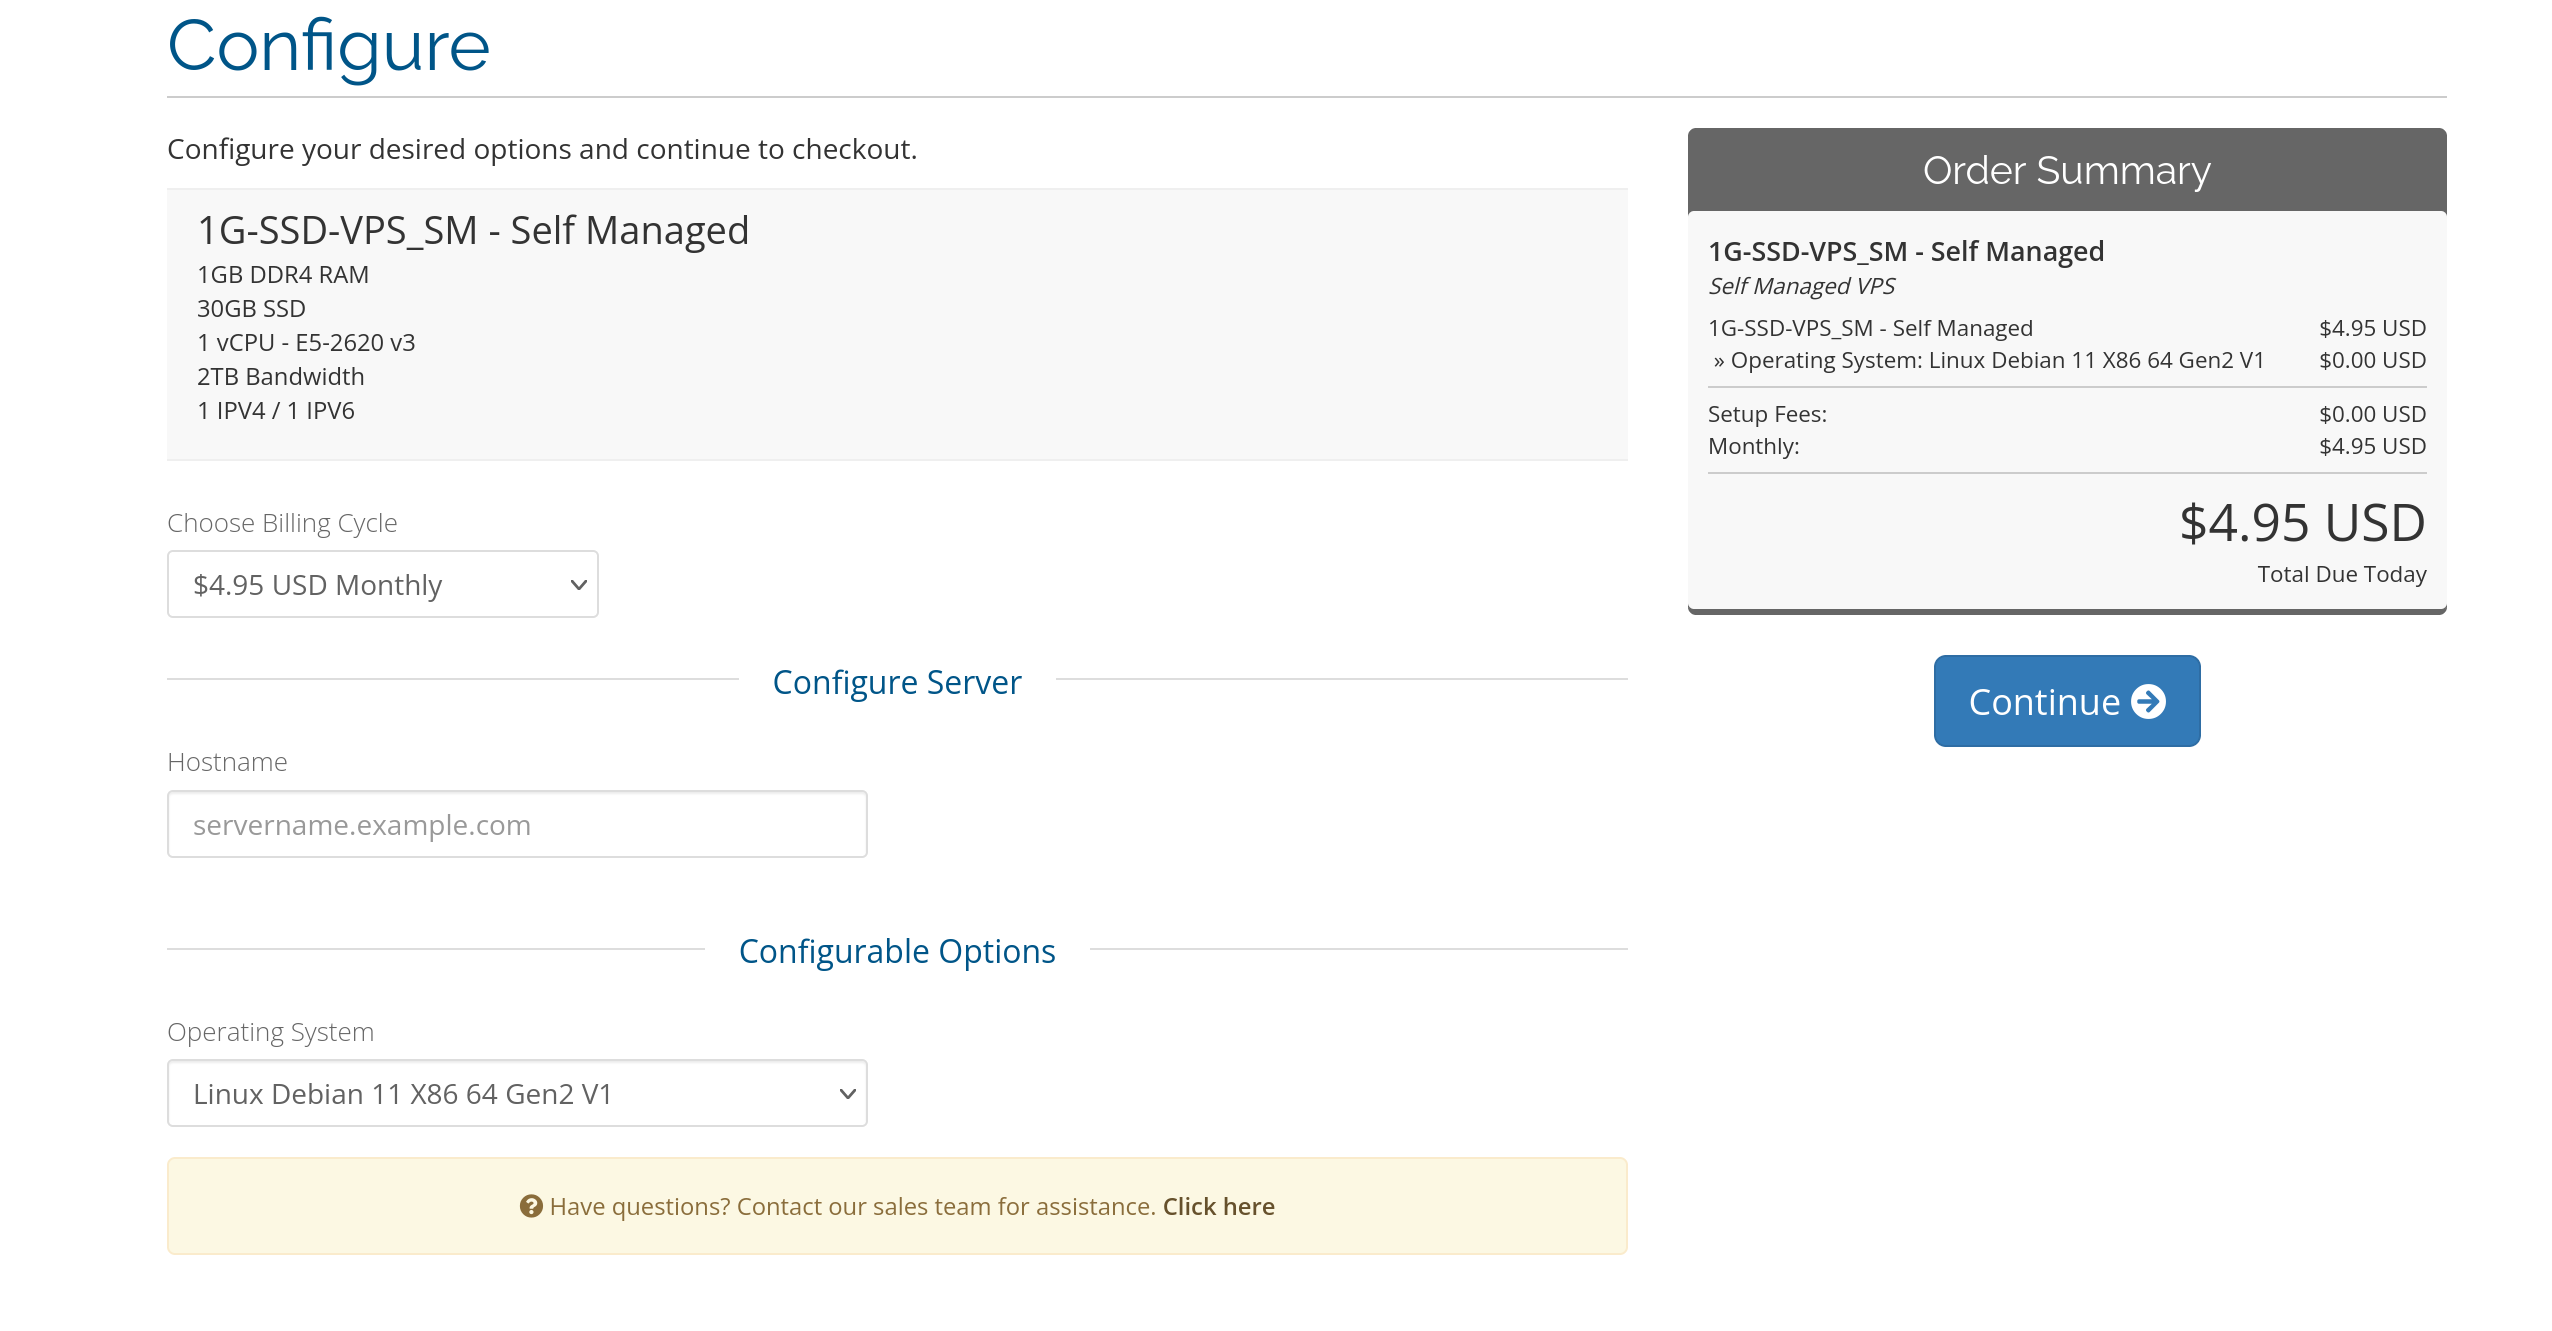
Once it have bought it, the hosting company now has to set up the server for you which can take a bit. In the mean time you can buy your domain name.
Buy A Domain Name

Just like VPS hosts, there are good domain registers and bad domain registers. Reliable Secure Domain registers are extremely important for a healthy diverse decentralized Internet.
Here are the domain registers I recommend: Porkbun, Hover, Dynadot
A lot of VPS hosts also function as domain registers but I wouldn't put all your eggs in one basket.
When it comes to bad domain registers, Godaddy takes the cake again. There are a lot of companies that just buy up domain names for cheap and sell them for some insane bullshit price. This is called cybersquatting and is generally considered illegal.
Here are the Domain Register companies to avoid: Godaddy, Gandi, Domain.com, spaceship.com, crazydomains, Hostinger
Most Domain Registers are crap, but don't take my word for it. Everything changes with time. Do your homework. Talk to people.
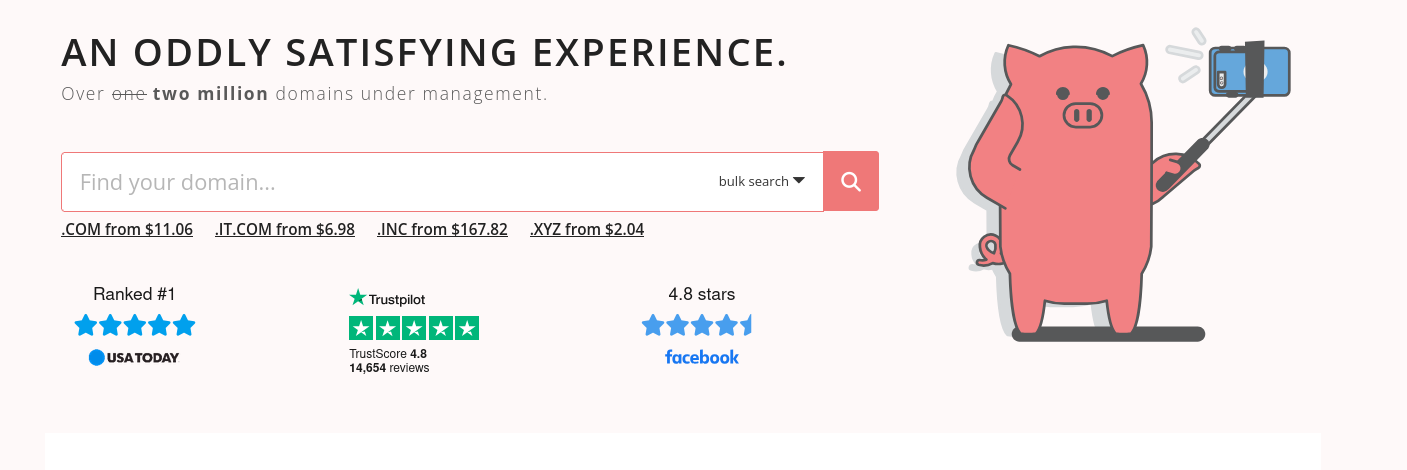
I will be choosing Porkbun.
Once you have chosen your domain register, it's time to pick a domain name. I recommend choosing a top level domain name because they come with the benefit of being built into the network infrastructure. Interesting domain names can be also be great, because they help keep the web diverse, so whatever suits you.
Now once you have that done, go back to your Virtual Private Server Host to see if your server is up.

Once it is, click on it and look for the IPv4 and IPv6 addresses. This is what you're going to connect back to your domain register.

Time to go back to Porkbun. Click on the details for the Domain name you bought.

Porkbun usually generates some records for you so when you visit your domain name on the web - it tells others that a user bought this domain name using porkbun. You can delete both these ALIAS and CNAME records.

First create an A record. All you have to do is copy the IPv4 address from the VPS host and paste it under the answer. Click add. Do the same for the AAAA record using the IPv6 address.
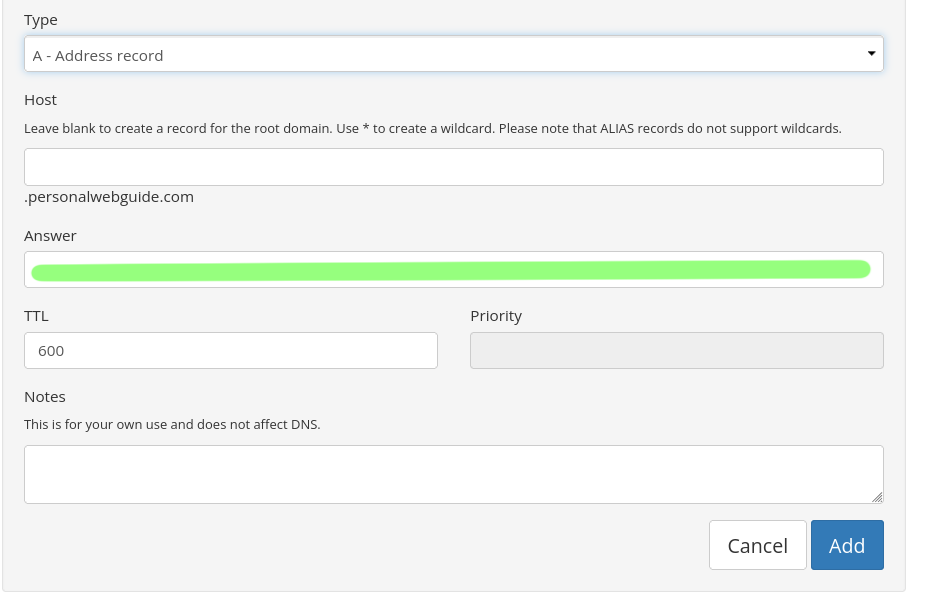
Your domain name records should look something like this.

Once they are added, it might take a bit for them to propagate in the network. I'd give it a couple minutes or so. To test it out, ping your domain name. Your IPv4 address should be returned back.

Get A Web Server

Luckily, unlike VPS or Domains, Web Servers are just open source tools we can run ourselves.
The main three used on the web are: Nginx, Lighttpd, and Apache.
I will use Nginx.
First you have to SSH into your VPS. Just type the following into terminal:
ssh root@yourdomainname
or alternatively:
ssh root@youripv4address
For SSH, domain names are used more because it's easier to remember. It will ask you if you are sure you want to connect - say yes. Then the server will ask for the root password. Use the password provided to you from your VPS host and paste it into terminal.
Both these next two commands ensures that you have the latest up-to-date software on your server. Using out of date software usually leads to errors so these commands are run first to make sure everything is updated:
apt update
apt upgrade
Now install Nginx:
apt install nginx
These next two commands start and enable Nginx:
systemctl start nginx
systemctl enable nginx
For VPS, it's important to set configurations with a universal text editor. For this reason, nano is used. If you don't know how to use nano, you can quickly learn the basics in like 5 minutes using an online tutorial. Regardless, you need to edit your website configuration so Nginx knows your website's domain name and ip address:
nano /etc/nginx/sites-available/website
Now to edit your site file use this template. Replace 'website' with the domain name of your website:
                    server {

                        listen 80;

                        listen [::]:80;

                        server_name website.com;

                        root /var/www/website;

                        index index.html index.htm;

                        location / {

                            try_files $uri $uri/ = 404;

                        }

                    }
Now you have to create a symbolic link for the website configuration file from the sites-available directory to the sites-enabled directory in Nginx. Only sites with configurations in sites-enabled are actually recognized and served by Nginx. This makes it easy to enable and disable sites within Nginx:
ln -s /etc/nginx/sites-available/website /etc/nginx/sites-enabled/
Now restart Nignx:
sudo systemctl restart nginx
To test your configuration file in Nginx run the following:
sudo nginx -t
You should get back:
nginx: the configuration file /etc/nginx/nginx.conf syntax is ok
nginx: configuration file /etc/nginx/nginx.conf test is successful
Create The Directory
Now make a directory for your website files. Create your website folder at '/var/www/...' - I would call the folder the name of your website's domain name, especially if you plan on having multiple websites with multiple different folders.
mkdir /var/www/website
Now create an index file on your site to deploy it:
nano /var/www/website/index.html
I would write something simple:
                    <!DOCTYPE html>

                    <h1>Hello, World!</h1>

                    <p>Welcome to my website!</p>
Firewall
Firewall is a bitch in networking. You have to make sure your firewall is not blocking Nginx. First install ufw (uncomplicated firewall) and enable it:
apt install ufw
Now enable:
ufw enable
To look up enabled ports, type the following:
ss -tuln
Under Local Address:Port you will see which ports are allowed in the firewall. You could also see the ports using:
ufw status
If port 80, 443, 8000, and 22 are not enabled, then please enable them using the following:
ufw allow 80
ufw allow 443
ufw allow 8000
ufw allow 22
Enabling port 80 allows users to access your site using standard HTTP.
Enabling port 443 allows users to access your site using encrypted HTTPS.
Enabling port 8000 allows you to access your site using a test server.
Enabling port 22 allows you to access your site using SSH. It is crucial that you enable this. If you don't you could get locked out of your SSH where you'll have to use your VPS host's online recovery tools to get back in.
Check Your Website
Reload Nginx:
systemctl reload nginx
Now visit your domain name in a browser. You should get the following:

Set Up TLS/SSH

Now you have to encrypt traffic coming to your site using let's encrypt. This will make sure HTTPS works. Luckily, cerbot makes this process really easy.
First install cerbot:
apt install python3-certbot-nginx
Then run cerbot:
certbot --nginx
It will ask you for your email. This is so it can email you when certificates need to get renewed. Even though certifications are automatically renewed, it's good to have a check system. You don't have to give your email if you don't want to using: --register-unsafely-without-email.
It will ask you what domains you want the certify. Choose your domain name or just select all. It may or may not ask you whether to automatically redirect all connections to be encrypted. Please select it if it does.
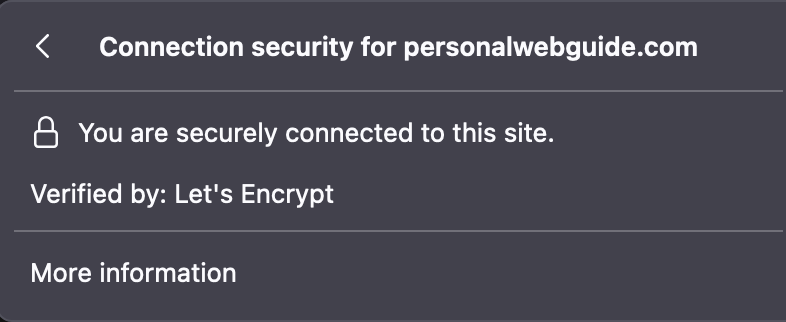
Now it should display a success message in terminal. If it does, check for the lock icon on your site in your browser. Click on it and check 'connection secure', you should see let's encrypt.
Set Up Users/SSH Keys
This part is entirely optional but highly recommended.
If you want to work on your site from multiple devices and you don't want to log in as the root user each time with the long complicated password, then I strongly recommend you set up SSH keys with users.
Each user will be a different device. So since I am working on my Labtop and my Desktop I will create two users (one for Labtop, one for Desktop), generate both users SSH keys with a simple passphrase to enter the SSH, and give them read and write access to only the website files.
SSH keys are really secure because only the user who has the SSH key on the device can access the SSH even if they have the simple passcode. So unless a hacker steals my labtop, they won't be able to gain access (and even then they would still have to know the passcode).
If they somehow do figure all that out and delete my website for some reason, then I can log in as the root user and revoke the user's privileges.
If they gain access to my root user, then I can disable my domain in my domain register and call my VPS host.
Regardless, you have a lot more leeway and options this way, so I highly recommend it for security purposes.
First as root, you will create a group:
groupadd webgroup
Next, give the group ownership read/write privileges to /var/www/:
sudo chown -R root: webgroup /var/www/
And then give the group read and write permissions for /var/www/:
sudo chmod -R 775 /var/www
Next, it's time to create a new user. Listen to this part very carefully as it's very important: Make you're logged in as the root user on your preferred device you will be using this user on. So if I am going to use this user on my labtop then I want to be logged in as root on my labtop for this.
If you're not then SSH on terminal from that device:
SSH root@websitedomain.com
I would name the user after the name of the device you're on. So if you're on a labtop, then name the user after that brand labtop. Same with desktop. Make sure you're logged in as root ON the device you will be using the user on.
Important - do not set a password for this user. When it says enter password, just press enter twice. You will create the password when you set the SSH key.adduser username
Add this user to the group:
usermod -aG webgroup username
As the root user, create a .ssh folder for the non-root user.
mkdir -p /home/username/.ssh
Next, give the non-root user ownership of the .ssh folder.
chown username:username /home/username/.ssh
And give the non-root user read and write permissions for the .ssh folder
chmod 700 /home/username/.ssh
Now open another terminal without SSH on your device and generate a key on it
ssh-keygen -t rsa -b 4096 -C "Device Name"
Press enter to save it to the default location.
Now this is the most important part. Choose a passphrase that is easy to remember. When you're generating multiple SSH keys for multiple devices you will be generating multiple passphrases. So if I have a passphrase for my desktop and then labtop, it's easier to remember both of them if they're related in someway, but not too related to make it easy to guess if that makes sense.
For example, the passphrase for my SSH key on my desktop could be GiantMario, but on my labtop it could be FastSonic. See how they are related in a way that makes it easy to remember, but hard to guess?
Regardless, map out easy passphrases for each of the devices you will be using.
Then enter the passphrase on your device.
Enter passphrase:
After that is finished it will show where your identification and public key is saved. This is your private key. It should be kept secure and never shared with anyone.
Your identification has been saved in /home/user/.ssh/id_rsa
This is your public key and it will be shared with your VPS user for secure access.
Your public key has been saved in /home/user/.ssh/id_rsa.pub
The next two lines after that are just more information to verify/identify your public key.
The key fingerprint is: SHA256: UQNuygFUkrtdH0jsNdQM9a0B6pog+090/9jlk0dPRKA Device Name
Now output the data and your public key
cat ~/.ssh/id_rsa.pub
Copy the entire output
ssh-ed25519 AAAAC3NzaC1lZDI1NTE5AAAAINzpLjzip0bGlLr4SfAlC3qSGunxfbHhcrcpKLQNmeMu Device Name
Now go back to the SSH terminal where you're still the root user. Switch to the new user you created:
su - username
Create the .ssh Directory:
mkdir -p ~/.ssh
Add the Public Key:
echo "ssh-ed25519 AAAAC3NzaC1lZDI1NTE5AAAAIN... Device Name" >> ~/.ssh/authorized_keys
Test the SSH Access as the non-root user:
ssh username@websitedomain.com
Enter your SSH Key:
Enter passphrase for key '/.ssh/id_rsa':
If all works well, you should be into the SSH as a non-root user and you should be able to edit your website files in /var/www/website. You can repeat this for as many different users on as many different devices as you want. Just make sure you add them to the group so they can edit the website.
Set Up An IDE

Now it's time to set up an IDE.
VSCodium
First one will be VSCodium. Simply download it here and install it on your preferred device.
Next add the extension 'Open Remote - SSH'
Once install, open it and use the shortcut:
mac: 'command + shift + p'
linux: 'crtl + shift + p'
click on 'Remote-SSH: Connect to Host...'
It will say the following:
Enter [user@]hostname[:post]
Just enter the user and the domain name, so how you would normally connect to SSH, but without the SSH.
username@websitedomain.com
or
root@websitedomain.com
It will ask you to enter your password/passphrase. Might ask again, which is why passphrases are really nice here. SSH is finicky, so try again if it doesn't work.
Then once your connected, click on the explorer, open folder, and navigate to your website folder. Click on '..' to go back (twice if your non-root) and then go the /var/ and then /www/ then your website and press ok.
Vim
Vim is a bit more tricky. If you're not familiar with vim, please try it out for a bit before continuing. Make sure to also install some plugins via vim-plug in the vimrc file - it's what makes Vim great.
Open SSH as the root user and install vim:
apt install vim
Next, install vim-plug:
curl -fLo /usr/share/vim/vimfiles/autoload/plug.vim --create-dirs \
                    https://raw.githubusercontent.com/junegunn/vim-plug/master/plug.vim
Create a Directory for Plugins:
sudo mkdir -p /usr/share/vim/vimfiles/plugged
Set The Ownership of the Plugins Directory:
sudo chown -R root:webgroup /usr/share/vim/vimfiles/plugged
Set The Permissions for the Plugins Directory:
sudo chmod -R 775 /usr/share/vim/vimfiles/plugged
Edit the Vim Configuration File:
vim /etc/vim/vimrc
Important - Make sure that 'runtime! debian.vim' is the first line of the vimrc file. If it isn't then you will run into issues. Then put whatever plugins you have below it.
                    "Load system defaults

                    runtime! debian.vim


                    "Vim themes with vimplug

                    call plug#begin('/usr/share/vim/vimfiles/plugged')


                    Plug 'pacokwon/onedarkhc.vim'

                    Plug 'embark-theme/vim', { 'as': 'embark', 'branch': 'main' }

                    Plug 'preservim/nerdtree'


                    call plug#end()


                    "Set colorscheme

                    colorscheme embark


                    "Set colors

                    set termguicolors


                    "Source a global configuration file

                    if filereadable("/etc/vim/vimrc.local")

                    source /etc/vim/vimrc.local

                    endif
To Install Plugins, open Vim by just typing Vim into terminal and then type:
:PlugInstall
Set Group Permissions on /etc/vim/vimrc:
chown root:webgroup /etc/vim/vimrc
chmod 664 /etc/vim/vimrc
Then test Vim by opening the index file for editing:
vim /var/www/website/index.html
Test each user out. Test each plugin out. If you run into issues, go back to the root user and test to see if group has permissions to each folder using:
ls -l /etc/vim/vimrc
ls -ld /usr/share/vim/vimfiles/plugged
Publish Site Using Git
You're at the homestretch. This part is optional, but I highly recommend it. Make sure you are logged in as root user.
First list your website folder in /var/www/:
ls /var/www/
website
Ok now make a test-website folder and copy all your website files to that folder:
cp -r /var/www/website/* /var/www/test-website/
Git initialize in test-website and in website:
git init /var/www/website
git init /var/www/test-website
Now go inside the website:
cd /var/wwww/website
Add remote origin from the test-website:
git remote add origin "var/www/test-website"
Then go back to test-website:
cd /var/wwww/test-website
Make a change in the index.html file using VSCodium or Vim:
vim index.html
Add the file to git:
git add .
commit the file to git:
git commit -m "Message here"
It might say it can't commit because no name or email. If it does then give them a fake one:
git config --global user.name "Your Name".
git config --global user.email "you@example.com"
Go to website:
cd /var/wwww/website
Inspect the index.html file of the website - make sure that it's different from the index.html of the test-website. Use either Vim or VSCodium:
vim index.html
If it is, then pull from test folder:
git pull origin master
You will have to commit with nano. Just press 'crtl+x'. Then inspect the website to see if the changes from test-website transferred to the website:
vim index.html
If they did, then git is set up correctly.
If you get an error - make sure you're logged in as root. If you get a merging error, make sure to merge correctly and repeat git add. If if it says it can't commit because 'git config --global user.name "Your Name/You@example.com"', then set those. Repeat with non-root users. If they can't commit then check their git permissions.
Now set up a test server so you can actually see the changes better. Navigate to your test-website:
cd /var/wwww/test-website
Open the index file with either Vim or VSCodium and make a change:
Vim index.html
Now open another terminal and go to test-website (or open VSCodium and go to it) by SSH of course:
cd /var/wwww/test-website
Type the following to set up a test python server:
python3 -m http.server
Go to this page in your web browser:
http://localhost:8000/
You should now see the changes you made to website-test. Add a change to the index.html and refresh the page to see the change:
Vim index.html
This test server is really important as it allows you to test changes on your site before deploying them to your actual live site. Now when you're ready to deploy, open your actual site up in another window, git add, git commit (in website-test), and git pull (in website), to see the changes from the test server apply to the main website.
Important Considerations
Backup on your site external hard drives.
Make sure to do frequent backups every couple months or so. For the best case use the 3-2-1 method.
VSCodium is 100 times easier than doing this in a terminal. Open VSCodium with SSH and instead of opening your website, just open /var/www/. Then within there, on the left side, right-click on your website and download it to your computer.
Connect an external hard drive to your computer. I recommend using a seagate external hard drive since they're easier to get into incase they fail. Transfer your website files from your computer to your external hard drive.
Do this twice on two hard drives every couple of months. Just replace the old website files with the new ones. You can choose encrypt your external hard drives with a passphrase if you want. If you choose to do that, then make them both easy to remember like you did for the SSH keys. Although these are just website files, so the data you're storing usually isn't really that sensitive.
Block Your Site From Indexing and Scraping
In recent years, AI companies have been scraping all the data off the internet while training their models off of it. There are no laws and rules regarding what they can and can not scrape. This has opened up huge ethical and moral questions.
If you want to tell AI companies to fuck off, then you can by simply adding a 'robot.txt' file to the main root of your site.
If you want your site to block all bots and search engines make sure the 'robot.txt' file says the following:
                        User-agent: *

                        Disallow: /
However, if you want your site to be indexed by certain search engines, but block everything else than you can specify those search engines:
                        User-agent: *

                        Disallow: /


                        User-Agent: search.marginalia.nu

                        Allow: /


                        User-Agent: wiby.me

                        Allow: /
If you want to allow everything, but block certain bots like Chatgpt, Google, Facebook, TikTok, Internet Archive - you can do so:
                        User-agent: CCBot

                        Disallow: /


                        User-agent: ChatGPT-User

                        Disallow: /


                        User-agent: GPTBot

                        Disallow: /


                        User-agent: Google-Extended

                        Disallow: /


                        User-agent: FacebookBot

                        Disallow: /


                        User-agent: Bytespider

                        Disallow: /


                        User-agent: ia_archiver

                        Disallow: /
You can see some of the bots you blocked by inputting your site into builtwith.com
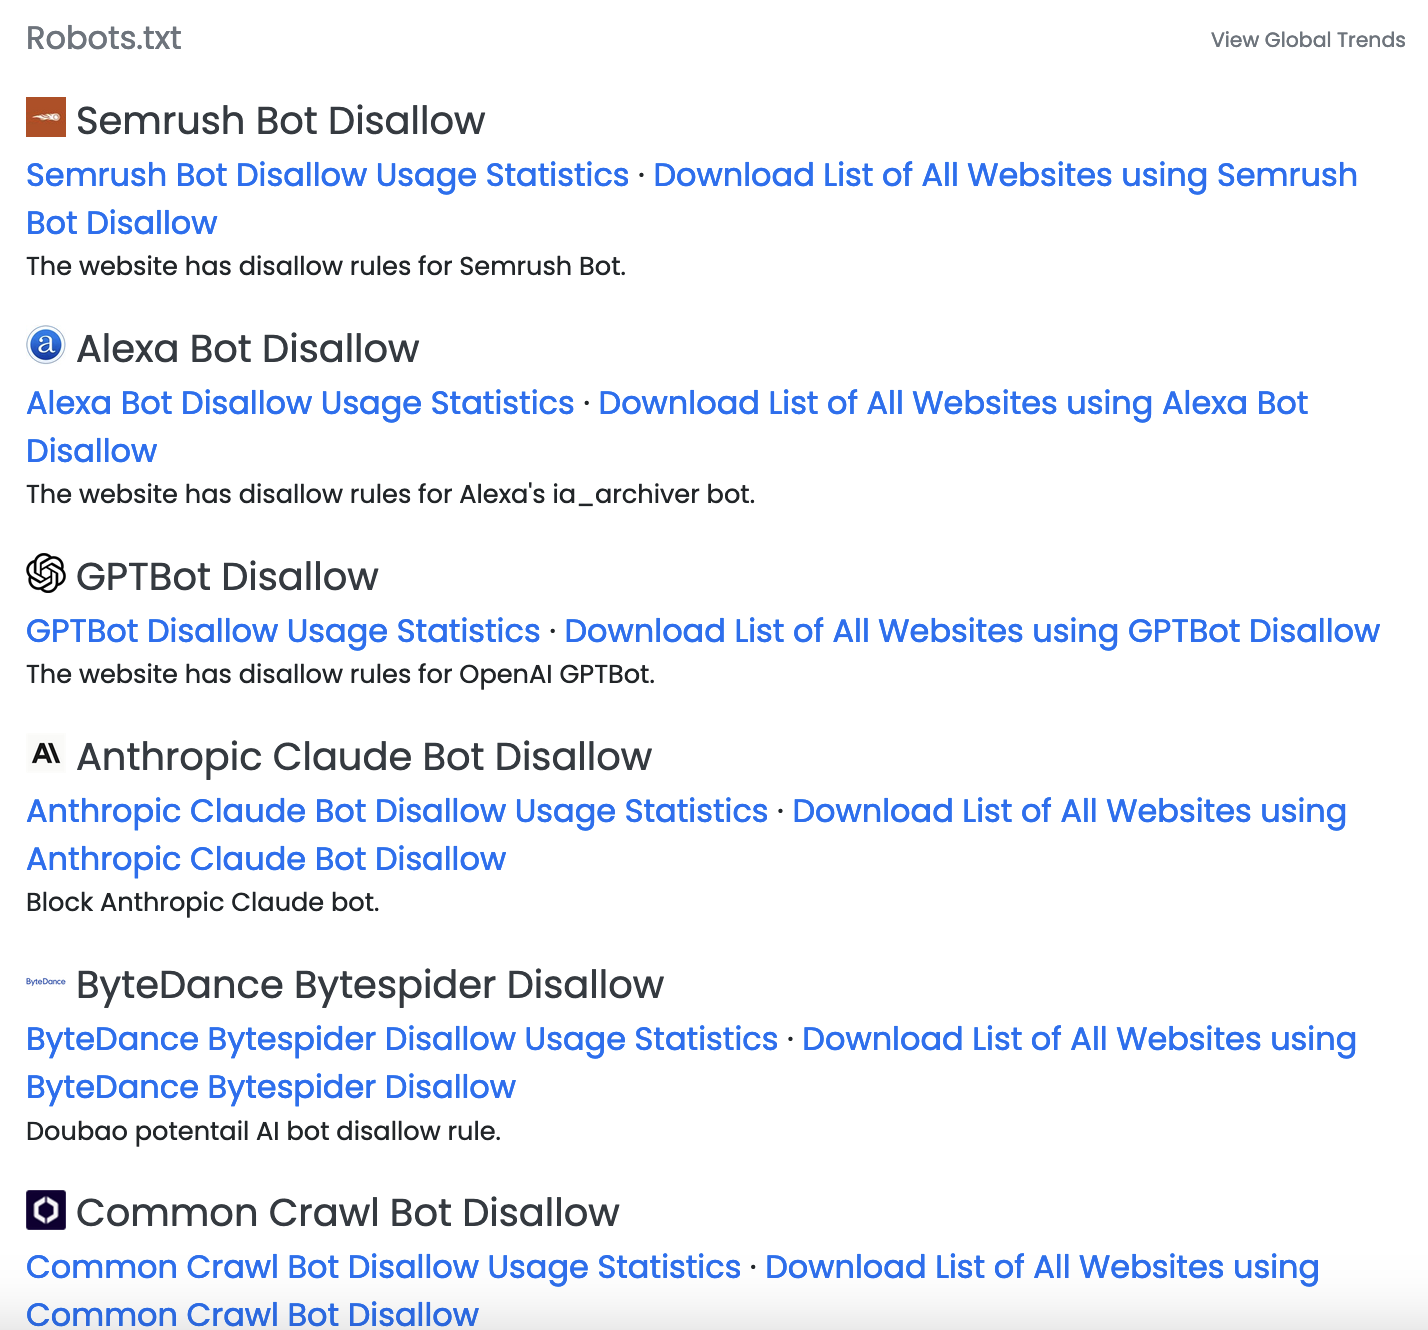
This won't work if you blocked everything because it won't be able to index your site.
But, for personal sites specifically, I think this suffices most use cases:
                        User-agent: *

                        Disallow: /
Then if you see any services that you like you can make them the exception while blocking everything else. And yeah this is a band-aid solution, but it's a good band-aid. The laws and rules around this may change, so we will see what happens.
Block Your Site From External Links From External Sites
Then there is the social media issue. If someone posts an external link of your site to social media, then millions of people can visit your site which could lead to a lot of network and privacy issues. There are a bunch of ways around this.
To block sites, edit that Nginx configuration file you set up in the beginning:
nano /etc/nginx/sites-available/website
If you want to be giga based you can block every domain that links to your site:
                        server {

                            listen 80;

                            listen [::]:80;

                            server_name website.com;

                            location / {

                                if ($http_referer !~* "^https?://(www\.)?website\.com") {

                                    return 403;

                                }

                            }

                        }
If you just want to block social media and allow everything else:
                         server {

                             listen 80;

                             listen [::]:80;

                             server_name website.com;

                             location / {

                                 set $blocked_referer 0;


                                 if ($http_referer ~* "(facebook|twitter|x|instagram|reddit|youtube|discord|tiktok|linkedin)\\.com") {

                                     set $blocked_referer 1;

                                 }


                                 if ($blocked_referer) {

                                     return 403;

                                 }

                             }

                         }
Since popular sites have multiple domain names, you'll have to cover a lot of ground. Much smarter to block everything and then slowly add the sites you trust:
                            server {

                                listen 80;

                                listen [::]:80;

                                server_name website.com;

                                location / {

                                    # Block all except "website.com" and "frensite.com"

                                    if ($http_referer !~* "^https?://(www\.)?(website\.com|frensite\.com)") {

                                        return 403;

                                    }

                                }

                            }
I would only unblock sites where both you and the other website owner both add each other's links. Like mutuals. You can email the site owner to let them know, but again it has to be a mutual thing. Don't unblock a site unless you're ok with them linking you. Mutuals just makes things safer for everyone.
If you start getting a lot of mutuals and fren sites, then it will be quite annoying to unblock them all from the configuration file. You can create a separate script file to help automate the process, which I'll probably write in another tutorial.
You can also display a custom message 403 page to blocked users by editing the custom_403.html file. Add this to the Nginx configuration file within the server block after the first location:
                            error_page 403 /custom_403.html;


                            location = /custom_403.html {

                            internal;

                            root /path/to/custom_403.html;

                            }
Block Your Site From Locations
You can even decide to block your website from entire countries like Russia, China, India, Iran, and North Korea. Even though users in said countries can bypass this through a VPN, it's still a good filter.
Create a blocklist directory:
mkdir -p /etc/nginx/ipdeny
Download Country-Specific IP Blocklists:
Russia:
wget -O /etc/nginx/ipdeny/ru.zone http://www.ipdeny.com/ipblocks/data/countries/ru.zone
China:
wget -O /etc/nginx/ipdeny/cn.zone http://www.ipdeny.com/ipblocks/data/countries/cn.zone
Iran:
wget -O /etc/nginx/ipdeny/ir.zone http://www.ipdeny.com/ipblocks/data/countries/ir.zone
India:
wget -O /etc/nginx/ipdeny/in.zone http://www.ipdeny.com/ipblocks/data/countries/in.zone
North Korea:
wget -O /etc/nginx/ipdeny/kp.zone http://www.ipdeny.com/ipblocks/data/countries/kp.zone
Format the Blocklists for Nginx:
sed -i 's/^/deny /' /etc/nginx/ipdeny/*.zone
sed -i 's/$/;/' /etc/nginx/ipdeny/*.zone
Configure Nginx to Include Blocklists:
nano /etc/nginx/conf.d/block_countries.conf
Add Country Block Directives in block_countries.conf:
                         # Block Russia

                        include /etc/nginx/ipdeny/ru.zone;

                        # Block China

                        include /etc/nginx/ipdeny/cn.zone;

                        # Block Iran

                        include /etc/nginx/ipdeny/ir.zone;

                        # Block India

                        include /etc/nginx/ipdeny/in.zone;

                        # Block North Korea

                        include /etc/nginx/ipdeny/kp.zone;
Integrate the Block Configuration with Nginx:
                         http {

                         include /etc/nginx/conf.d/block_countries.conf;


                        server {

                            listen 80;

                            listen [::]:80;

                            server_name website.com;

                            location / {

                           ........

                                }

                                }

                            }
Then just test and reload:
nginx -t
systemctl reload nginx
Since IPdeny updates their blocklists you can set a cron job to update these lists automatically. However, if you're blocking multiple countries it gets a little annoying to format, so to simplify, I will use a script file to automate Blocklist updates:
nano local/bin/update_blocklist.sh
Add the following:
                         # Set the Block List Directory

                        BLOCKLIST_DIR="/etc/nginx/ipdeny"


                         # Create the Block List Directory

                        mkdir -p $BLOCKLIST_DIR


                         # Download Blocklists for Russia, China, Iran, India, and North Korea

                        wget -q -O $BLOCKLIST_DIR/ru.zone http://www.ipdeny.com/ipblocks/data/countries/ru.zone

                        wget -q -O $BLOCKLIST_DIR/cn.zone http://www.ipdeny.com/ipblocks/data/countries/cn.zone

                        wget -q -O $BLOCKLIST_DIR/ir.zone http://www.ipdeny.com/ipblocks/data/countries/ir.zone

                        wget -q -O $BLOCKLIST_DIR/in.zone http://www.ipdeny.com/ipblocks/data/countries/in.zone

                        wget -q -O $BLOCKLIST_DIR/kp.zone http://www.ipdeny.com/ipblocks/data/countries/kp.zone


                         # Format the Blocklists for Nginx

                        sed -i 's/^/deny /' $BLOCKLIST_DIR/*.zone

                        sed -i 's/$/;/' $BLOCKLIST_DIR/*.zone


                        systemctl reload nginx
Then, like any script file, you have to make it executable:
chmod +x local/bin/update_blocklist.sh
Then just update the crontab file:
crontab -e
I will update it once a month:
0 0 1 * * local/bin/update_blocklist.sh
My recomendation is to block your site from everything and slowly add trust valves here and there, but always be ready to block. Setting boundaries is good. It's healthy. It should be reinforced more in society.
Monitor your VPS Host and Domain Register
Always check up on your VPS Host and Domain Register every now and then. Check their updates, check their blog, and continue checking to see what people think about them.