Server Side JavaScript Building Guide

Since we're using Node.js, I assume you are building a website for a large organization and you would like to scale that to millions of users. I would first figure out what kind of user content you want to serve on that website and how you want your users to interact with that served content.
To get started with Server Side JavaScript, you'll need to install multiple dependencies. Server Side JavaScript is one of those languages where you need to see template projects before you create your own. Throwing someone in the deep end and expecting them to build everything at once without seeing the whole picture is really annoying and stupid. Server Side JavaScript is a language where you need to model and draw out everything before you start building. Build one thing at a time and TEST everything once you've built it.
Install Node.js

The First step is to install Node.js, it's highly recommended that you use NVM (Node Version Manager). The NVM is available both on Linux and Mac. For current details refer to the node.js documentation.
First, open terminal and install NVM:
curl -o- https://raw.githubusercontent.com/nvm-sh/nvm/v0.40.1/install.sh | bash
Download and install Node.js using NVM:
nvm install 22
Verify the Node.js version:
node -v
Verify the npm version:
npm -v
Install a Back-End Framework (Express.js)
If you need any help, please refer to Express.js documentation here.
Now it's time to create a new project. Create a project folder and open it with VSCodium. Navigate to terminal within VSCodium and run the following:
npm install express-generator
You should get the folder node_modules, package-lock.json, and package.json. Node_modules is where all your project’s dependencies are installed. Package.json contains metadata about your project's dependencies. Package-lock.json ensures that the exact version of the dependency is installed.
To install express within your current folder run:
npx express-generator
When it says "destination is not empty, continue? [y/N]" say 'y'.
The original way you had to do this was to setup all the folders and files in a specific way on your own machine which is a stupid waste of time. Always use templates and boilerplate code when you can. Makes your life 100 million times easier.
I will talk more about the express.js files/folders in a second, in the meantime install dependencies with:
npm install
Then start the app with:
npm start
Navigate to the following address within a web browser:
http://localhost:3000
You should see this:

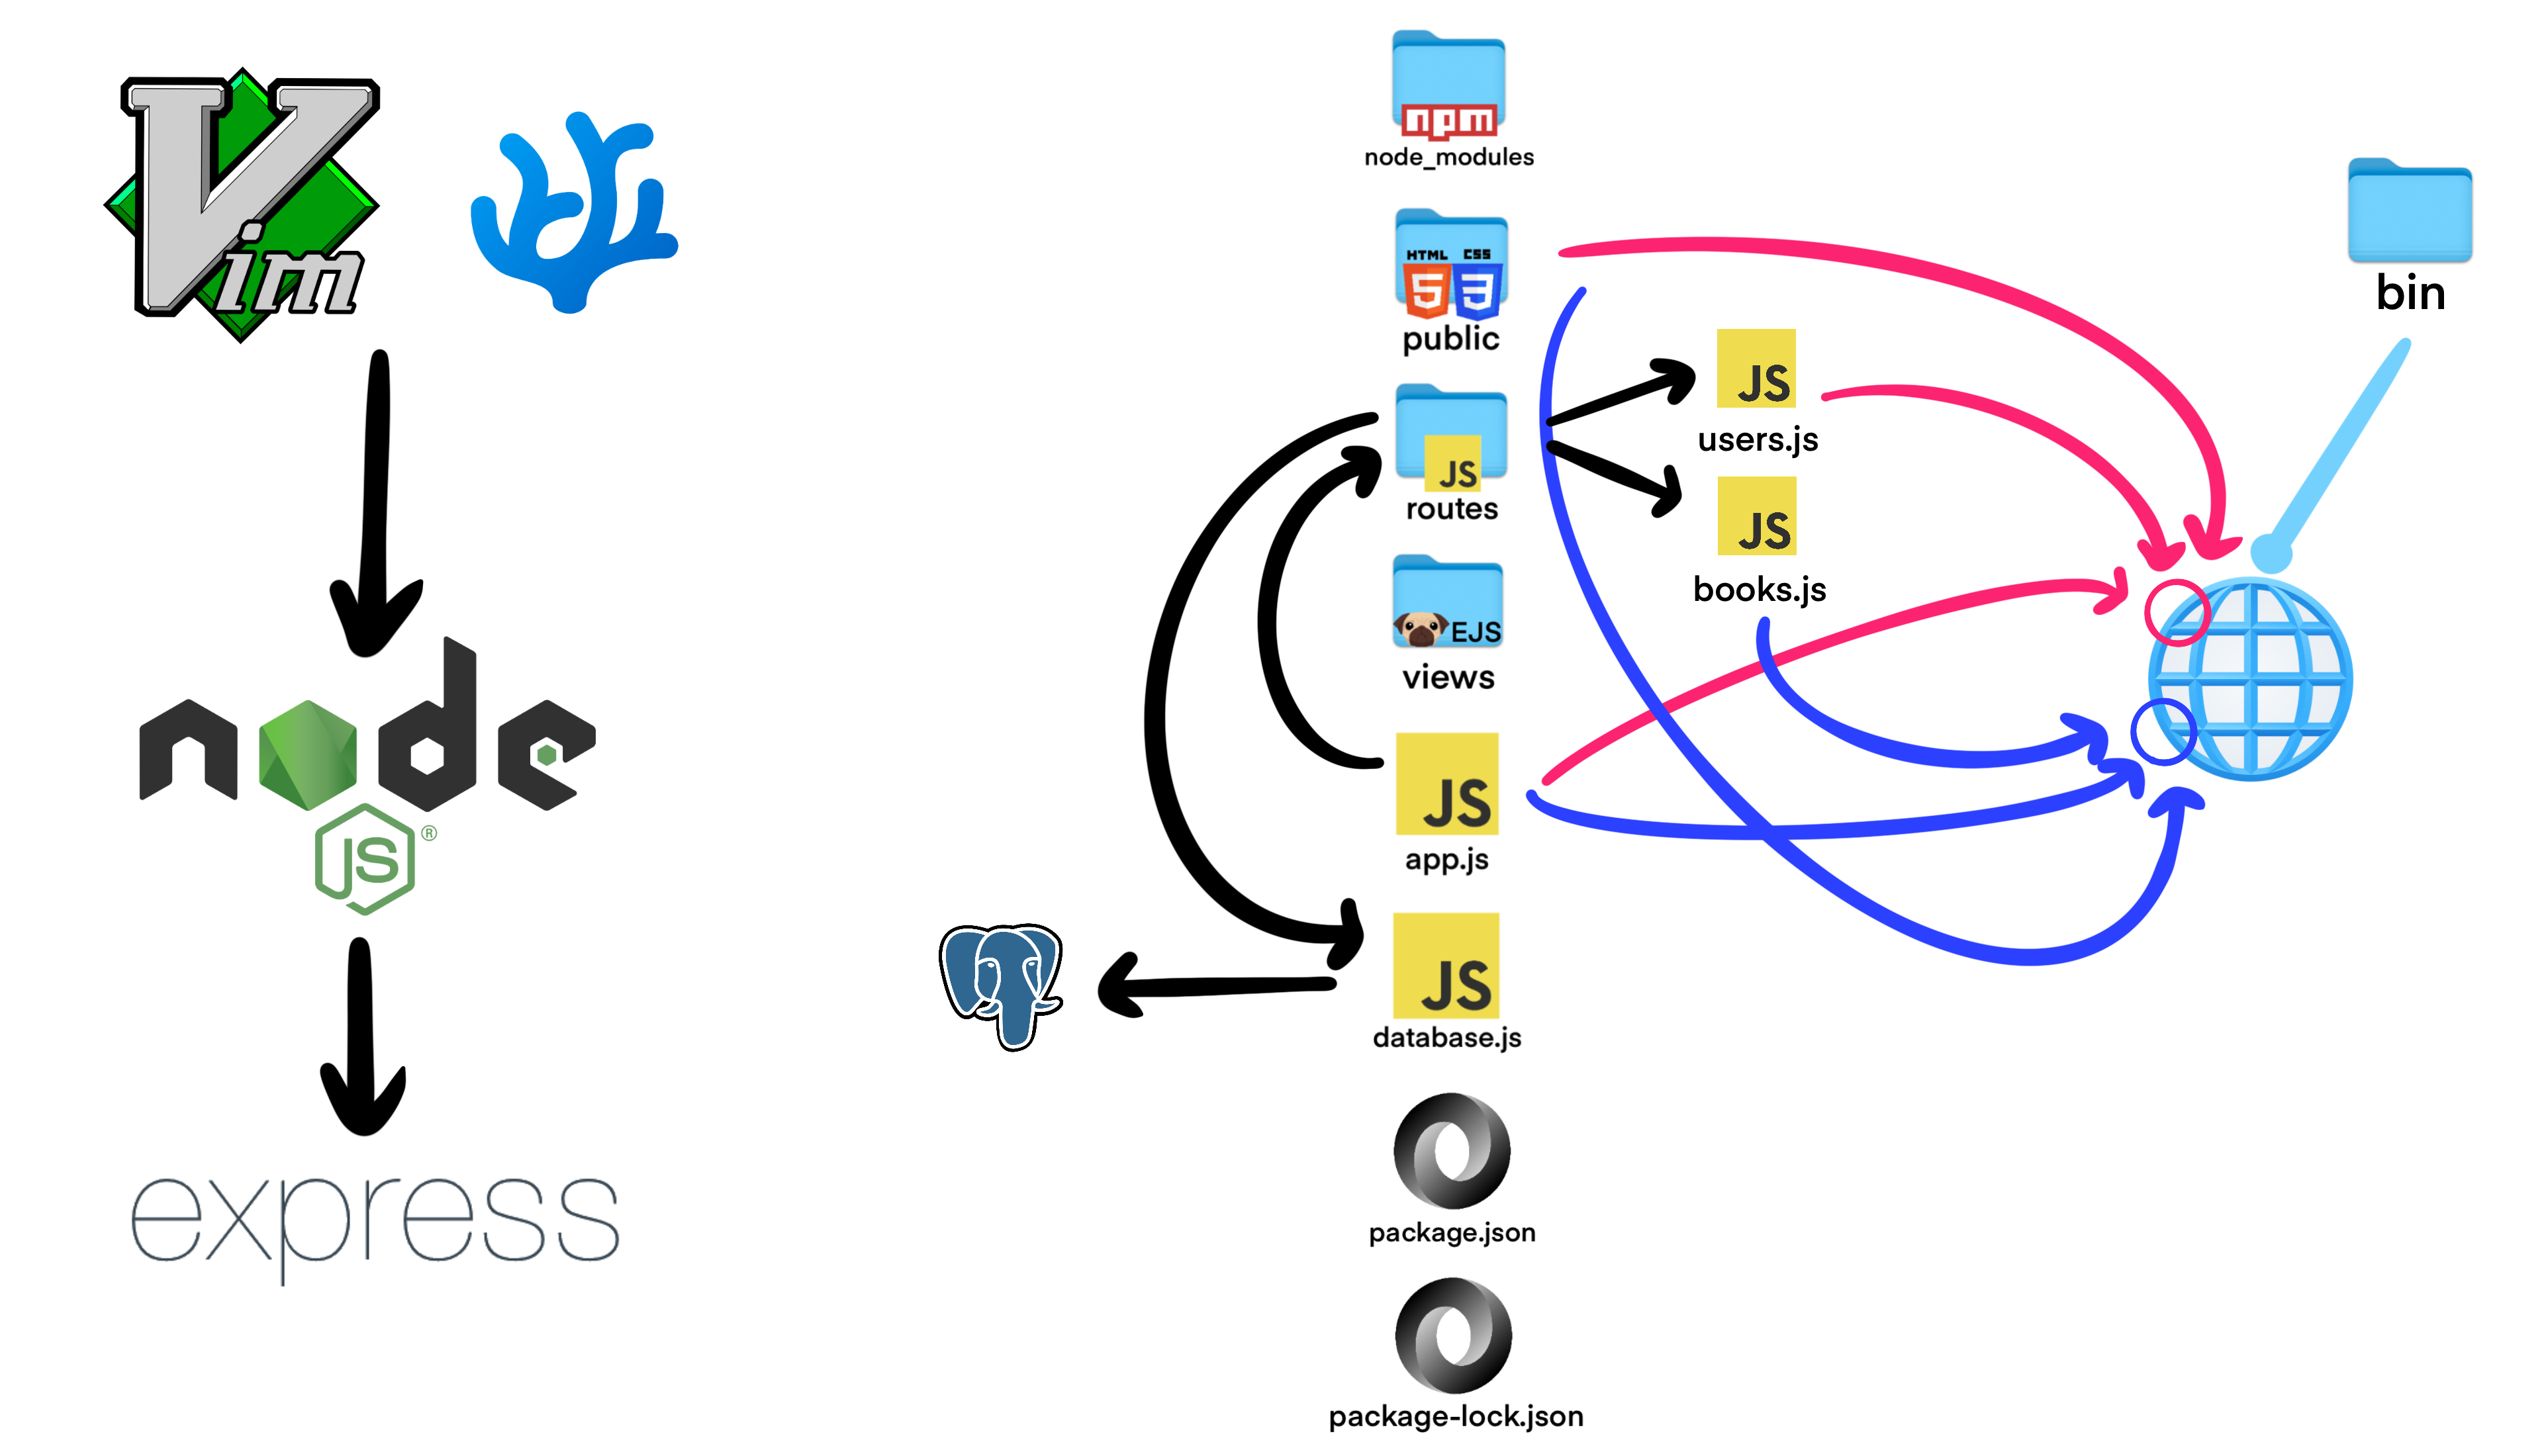
Your express directory should look like this:
                    >bin

                    >node_modules

                    >public

                    >routes

                    >views

                    app.js

                    package-lock.json

                    package.json
The bin folder will start the server.
The public folder will contain the Static Files (HTML) (CSS) (Vanilla JavaScript).
The routes folder will contain the Server Side JavaScript Files.
The views folder will contain templates for rendering dynamic content. I won't be using it within this project.
The app.js file will set the stage for everything.
These folders/files will make more sense as you look at more code and work with them more.
First create a index.html within the public folder with the following code:
                    <!DOCTYPE html>

                    <html lang="en">

                    <head>

                        <meta charset="UTF-8">

                        <meta name="viewport" content="width=device-width, initial-scale=1.0">

                        <title>Hello World</title>

                    </head>

                    <body>

                        <h1>Hello, World!</h1>

                    </body>

                    </html>
Then go to this address within your browser (make sure you have npm start running - refresh the page):
localhost:3000
You should see this:

Now here is my suggestion: Create your static site first -> Then add the vanilla JavaScript -> Then add the Server Side JavaScript. I DO NOT recommend getting into Server Side JavaScript until you have your Static Site built first. Only after that you can add complexity.
Install a Database (PostgreSQL)

There are many databases you could use with express.js including: MySQL, PostgreSQL, SQLite, CouchDB, and Redis. Pretty much all the big ones. In this tutorial I will use PostgreSQL. PostgreSQL is an open source community owned relational database, but feel free to use whatever you want, just read their documentation and adjust your project accordingly. Installation Details Here.
Since we're adding a database to this project, create a database.js right next to the app.js. Add the following code to it:
                    const { Sequelize, DataTypes } = require('sequelize');


                    // Set up Sequelize instance

                    const sequelize = new Sequelize('accountsdatabase', 'postgres', 'moodeng', {
                    host: 'localhost',
                    dialect: 'postgres',
                    logging: console.log,

                    });
                    // Sync models with the database

                    const syncDB = async () => {

                    try {

                    await sequelize.authenticate();

                    console.log('Connected to PostgreSQL successfully.');


                    // Sync all models

                    await sequelize.sync({ alter: true });

                    console.log('All models synchronized successfully.');

                     } catch (error) {

                    console.error('Failed to connect to or sync with PostgreSQL:', error);

                    throw error;

                    }

                    };
The database I created is 'accountsdatabase', the username I used is 'postgres', and the password I created is 'moodeng'. You can change them if you would like. Now it's time to install PostgreSQL.
MacOS
First install homebrew if it's not already installed:
/bin/bash -c "$(curl -fsSL https://raw.githubusercontent.com/Homebrew/install/HEAD/install.sh)"
Verify installation:
brew --version
Then install postgresql:
brew install postgresql
Verify installation:
psql --version
Start the PostgreSQL service:
brew services start postgresql
\q
Linux (Debian)
First update your packages:
sudo apt update
Then install postgre:
apt install postgresql
Verify installation:
psql --version
Start the PostgreSQL service:
sudo systemctl start postgresql
Enable PostgreSQL service so you don't have to always start it:
sudo systemctl enable postgresql
Exit PostgreSQL:
\q
Install PostgreSQL for node.js
We have to install PostgreSQL for node.js. To do so run the following command within the terminal within VSCodium:
npm install pg
PostgreSQL extension
It's highly recommended that you install the postgreSQL extension within VSCodium. The one you should get is by Chris Kolkman not Microsoft. This will just serve as a visual aid and it helps confirm our terminal commands are working.
Install and Setup GoodBooks

Everything you did before this was just setting up the tools. To see the tools in action, please download the GoodBook project, open it with VSCodium, and run it within VSCodium with 'npm run start'.
I created an online book e-commerce site that is meant to be shown as an example of a site that utilizes Server Side JavaScript with a postgresql database. I wanted to make it as simple and watered down as possible.
You can download it, run it, make a user account on it, pretend to buy a book, and then have that book under your user account. You can look at all the users and book purchases within the database. This is meant as a teaching tool. I highly recommend you read the code blocks below and slowly understand each block of code as you test the website out and slowly gain each understanding of each different layer.
The following code show below shows how to utilize Server Side JavaScript to fetch data on a website. Server Side JavaScript is used when you want to authenticate/add users through a database, fetch a lot of content to render that content dynamically, and add content to a database based on the user's decisions.
app.js
The first thing you have to do is to create an instance of the Express application:
const app = express();
You will use 'app' to modify the instance of the express application within app.js. You can do this through adding middleware, defining routes, and connecting to a database.
First I will import the routes file (users.js) and (books.js) to be used with the usersRouter and booksRouter (more on them down below):
                // Import Routers

                const usersRouter = require('./routes/users');

                const booksRouter = require('./routes/books');
Then I will mount usersRouter to the '/api' path and mount booksRouter to the '/books' path:
                // Routes

                app.use('/api', usersRouter);

                app.use('/books', booksRouter);
Note these are the addresses on the server that the content will be served over. You can confirm them within the network tab within inspect element when clicking on a link.
Database.js
Ok now to actually start PostgreSQL we need to enter some terminal commands.
PostgreSQL
MacOS
Connect to the PostgreSQL database command-line interface with the user postgres (unless you want to change the user account name):
psql -U postgres
Create the database with the name 'accountsdatabase':
create database accountsdatabase;
Give the user a password:
alter user postgres with password 'moodeng';
Quit the service:
\q
Linux (Debian)
Connect to the PostgreSQL database:
sudo systemctl start postgresql
Connect to the PostgreSQL database whenever the system boots:
sudo systemctl enable postgresql
Switch to user postgres:
sudo -i -u postgres
Create the database with the name 'accountsdatabase':
create database accountsdatabase;
Give the user a password:
alter user postgres with password 'moodeng';
Quit the service:
\q
book.js
On e-commerce websites, if the website has hundreds of products then it makes sense to store those products on databases and pull from those databases. However, on some e-commerce websites they might only have a couple products to choose from and so it doesn't make sense to store a few products in a database. Instead you can just use and pull from an array.
On the other hand, for user accounts and purchases, it does make sense to have a database because those entities can infinitely scale up. We might only have 3 products on the website but we might have hundreds of thousands of users/purchases.
In this example, we only have 48 books to choose from so I didn't make a database and instead used an array:
                const books = [

                {...},
                ];
Next, I need a route that sends a list of books in JSON format when someone visits the root path (/).
Define an array route on a server:
                // Route to serve all books as JSON

                router.get('/', (req, res) => {

                  res.json(books);

                });
Define a route that lets you fetch a single book by its ID from a list of books:
                // Route to fetch a single book by ID

                router.get('/:id', (req, res) => {

                const bookId = parseInt(req.params.id);

                const book = books.find(b => b.id === bookId);


                if (book) {

                res.json(book);

                } else {

                res.status(404).json({ message: 'Book not found' });

                }

                });
browse.html
Now once you have the route set up, you want to define what static files you will be serving that data over. I want to serve my books over browse.html and book-details.html, so I will have to write code within both of those static files that fetches those books from the server defined within the routes file (book.js). Notice how we always use try and catch statements whenever we fetch data from a server.
Define an async function that fetches a list of books from the server, organizes them by genre, and then displays them on the page:
                // Fetch books from the server

                const fetchBooks = async () => {

                try {

                const response = await fetch('/books');

                const books = await response.json();


                const genres = books.reduce((acc, book) => {

                acc[book.genre] = acc[book.genre] || [];

                acc[book.genre].push(book);

                return acc;

                 }, {});


                renderBooks(genres);

                } catch (error) {

                console.error('Error fetching books:', error);

                container.innerHTML = '<p>Failed to load books. Please try again later.</p>';

                }

                };
book-details.html
Fetch the details of a specific book from the server using the book's ID, then update the webpage with the book's information:
                // Fetch details for a specific book

                fetch(`/books/${bookId}`)

                .then(response => response.json())

                .then(book => {

                if (!book || book.message) {

                bookDetailsContainer.innerHTML = '<p>Book not found</p>';

                return;

                }


                // Populate book details

                const { title, author, genre, year, description } = book;

                const sanitizedTitle = title.replace(/[^a-zA-Z0-9]/g, '').replace(/\s+/g, '');

                const bookImageUrl = `bookimages/${genre.toLowerCase()}/${sanitizedTitle}.jpg`;


                document.getElementById('book-title').textContent = title;

                document.getElementById('book-author').textContent = author;

                document.getElementById('book-genre').textContent = genre;

                document.getElementById('book-year').textContent = year;

                document.getElementById('book-description').textContent = description;

                document.getElementById('book-image').src = bookImageUrl;

                document.getElementById('book-image').alt = title;


                // Add Buy Now button logic

                document.getElementById('buy-now-button').addEventListener('click', () => handleBuyNow(book, bookImageUrl));

                })

                .catch(error => {

                console.error('Error fetching book details:', error);

                bookDetailsContainer.innerHTML = '<p>Failed to load book details</p>';

                });

                });
database.js - users
For user accounts, since user accounts will be in the database we have to write that functionality within database.js. If you've taken a databases class before, then you will be familiar with the terminology shown here. This will create the table 'users' for the 'accountsdatabase':
                // Define the User model

                const User = sequelize.define('User', {

                  id: {

                type: DataTypes.INTEGER

                autoIncrement: true,

                primaryKey: true,

                },

                name: {

                type: DataTypes.STRING,

                allowNull: false,

                },

                email: {

                type: DataTypes.STRING,

                unique: true,

                allowNull: false,

                },

                }, {

                tableName: 'users',

                });
users.js - POST /signup
Now that we have a table for users within our database, let's create route functionality to fetch data from the server.
We need users to be able to sign up so define a POST route at '/signup' for handling user registration:
                // POST /signup

                router.post('/signup', async (req, res) => {

                const { name, email, password } = req.body;


                try {

                // Check if the user already exists

                const existingUser = await User.findOne({

                where: {

                [Sequelize.Op.or]: [{ name }, { email }]

                }

                });


                if (existingUser) {

                return res.status(400).json({ message: 'User account already exists!' });

                }


                // Insert the new user

                const newUser = await User.create({ name, email, password });

                res.json({ message: 'Sign-up successful!', userId: newUser.id });

                } catch (error) {

                console.error('Error during sign-up:', error);

                res.status(500).json({ message: 'Failed to sign up user', error });

                }

                });
Signup.html
Fetch a POST request to the server at the endpoint '/api/signup' to create a new user account (The 'api' specifies the route we are using and the 'signup' specifies which method we are using in the route):
                 // Sends a POST request to the server at '/api/signup' to create a new user account

                fetch('api/signup', {

                method: 'POST',

                headers: { 'Content-Type': 'application/json' },

                body: JSON.stringify({ name, email, password })

                })

                .then(response => response.json())

                .then(data => {

                alert(data.message);

                })

                .catch(error => {

                console.error('Error:', error);

                alert('There was an error with the sign-up.');

                });
users.js - POST /login
We have to do the same sort of thing for login. We need need users to be able to login, so define a POST route at '/login' which checks for user authentication:
                // POST /login

                router.post('/login', async (req, res) => {

                const { name, password } = req.body;


                try {

                const user = await User.findOne({ where: { name } });


                if (!user) {

                return res.status(401).json({ success: false, message: 'User not found' });

                }


                if (user.password === password) {

                res.json({ success: true, message: 'Login successful!', userId: user.id });

                } else {

                res.status(401).json({ success: false, message: 'Incorrect password' });

                }

                } catch (error) {

                console.error('Error during login:', error);

                res.status(500).json({ success: false, message: 'An error occurred during login', error });

                }

                });
Login.html
Then fetch a POST request to the server at '/api/login' with the user's username and password to log in:
                // Sends a POST request to the server at '/api/login' with the username and password

                fetch('/api/login', {

                method: 'POST',

                headers: { 'Content-Type': 'application/json' },

                body: JSON.stringify({ name, password })

                })

                .then(response => response.json())

                .then(data => {

                if (data.success && data.userId) {

                // Store both userId and username in sessionStorage

                sessionStorage.setItem('username', name);

                sessionStorage.setItem('userId', data.userId);

                alert('Login successful!');

                window.location.href = 'index.html';

                } else {

                alert('Login failed: ' + data.message);

                }

                })

                .catch(error => {

                console.error('Error:', error);

                alert('There was an error with the login.');

                });
Note for security purposes, sessionStorage or localStorage tokens are NOT used. Instead a session token is used within combination of HTTP-Only Cookies plus a bunch of other security code built in. This code can be rebuilt, but for simplicity I will just use sessionStorage.
Index.html
You can get the user's account details from sessionStorage.getItem():
                // Retrieve User Data
                const userId = sessionStorage.getItem('userId');
                const username = sessionStorage.getItem('username');
database.js - purchases
Now we want to keep track of the user's purchases within the database so let's create another table and write some more functionality within database.js to do that:
                // Define the Purchase model

                const Purchase = sequelize.define('Purchase', {

                  userId: {

                type: DataTypes.INTEGER,

                allowNull: false,

                },

                bookId: {

                type: DataTypes.STRING,

                allowNull: false,

                },

                purchasedAt: {

                type: DataTypes.DATE,

                defaultValue: Sequelize.NOW,

                  },

                  bookTitle: {

                type: DataTypes.STRING,

                allowNull: false,

                  },

                bookImageUrl: {

                type: DataTypes.STRING,

                allowNull: false,

                },

                }, {

                tableName: 'purchases',

                });
When you're done writing your databases/tables/functionality, make sure to export everything:
module.exports = { sequelize, syncDB, addPurchase, User, Purchase };
users.js - POST /purchase
We want a user to be able to purchase a book and save that purchase with the associated account to the Purchases table within the accountsdatabase.
Define a POST route at '/purchase' to save details of a book purchase to the database:
                // POST /purchase to save a purchased book

                router.post('/purchase', async (req, res) => {

                const { userId, bookId, purchasePrice, bookTitle, bookImageUrl } = req.body;


                  if (!userId || !bookId || !purchasePrice || !bookTitle || !bookImageUrl) {

                return res.status(400).json({ message: 'Missing required data.' });

                }


                try {

                const purchase = await Purchase.create({

                userId,

                bookId,

                purchasePrice,

                bookTitle,

                bookImageUrl,

                });


                res.status(200).json({ message: 'Purchase saved successfully', purchaseId: purchase.id });

                } catch (error) {

                console.error('Error saving purchase:', error);

                res.status(500).json({ message: 'Failed to save purchase', error });

                }
                });
Buy.html
Let's utilize that server side functionality we just wrote. On buy.html, after the user has given all the details, fetch a POST request to the server at '/api/purchase' to save details of a book purchase:
                // Sends a POST request to the server at '/api/purchase' to create a new purchase

                try {

                const response = await fetch('/api/purchase', {

                method: 'POST',

                headers: { 'Content-Type': 'application/json' },

                body: JSON.stringify({

                userId,

                bookId,

                purchasePrice: parseFloat(purchasePrice),

                bookTitle,

                bookImageUrl,

                }),

                });


                if (!response.ok) throw new Error(`Server error: ${response.status}`);


                const data = await response.json();

                if (data.message === 'Purchase saved successfully') {

                alert(`Thank you for your purchase, ${cardName}!`);

                setTimeout(() => window.location.href = 'index.html', 1000);

                } else {

                alert('Failed to save purchase. Please try again.');

                }

                } catch (error) {

                console.error('Error saving purchase:', error);

                alert('Error saving purchase. Please try again.');

                }
users.js - GET /:userId/purchases
We want to be able to get the users purchases so they can see it on their account. To do so, define a GET route at '/:userId/purchases' to fetch a list of books that a specific user has purchased:
                // GET /:userId/purchases to retrieve purchased books for a user

                router.get('/:userId/purchases', async (req, res) => {

                const userId = req.params.userId;


                try {

                const purchases = await Purchase.findAll({ where: { userId } });

                res.status(200).json(purchases);

                } catch (error) {

                console.error('Error retrieving purchases:', error);

                res.status(500).json({ message: 'Failed to retrieve purchases', error });

                }

                });


                module.exports = router;
Index.html
Then the last part, define a function, loadPurchasedBooks that fetches the purchase history for the user from the server and display the purchased books on the page:
                const loadPurchasedBooks = (userId) => {


                // Fetch the user's purchases from the server

                fetch(`/api/${userId}/purchases`)

                .then(response => {

                if (!response.ok) throw new Error('Failed to fetch purchases');

                return response.json();

                })

                .then(purchases => {

                purchasedBooks.innerHTML = purchases.length

                ? purchases.map(createBookEntry).join('')

                : '<p>No purchases found.</p>';

                 adjustContainerPadding(purchases.length);

                })

                .catch(() => {

                purchasedBooks.innerHTML = '<p>Failed to load purchases. Please try again later.</p>';

                });

                };
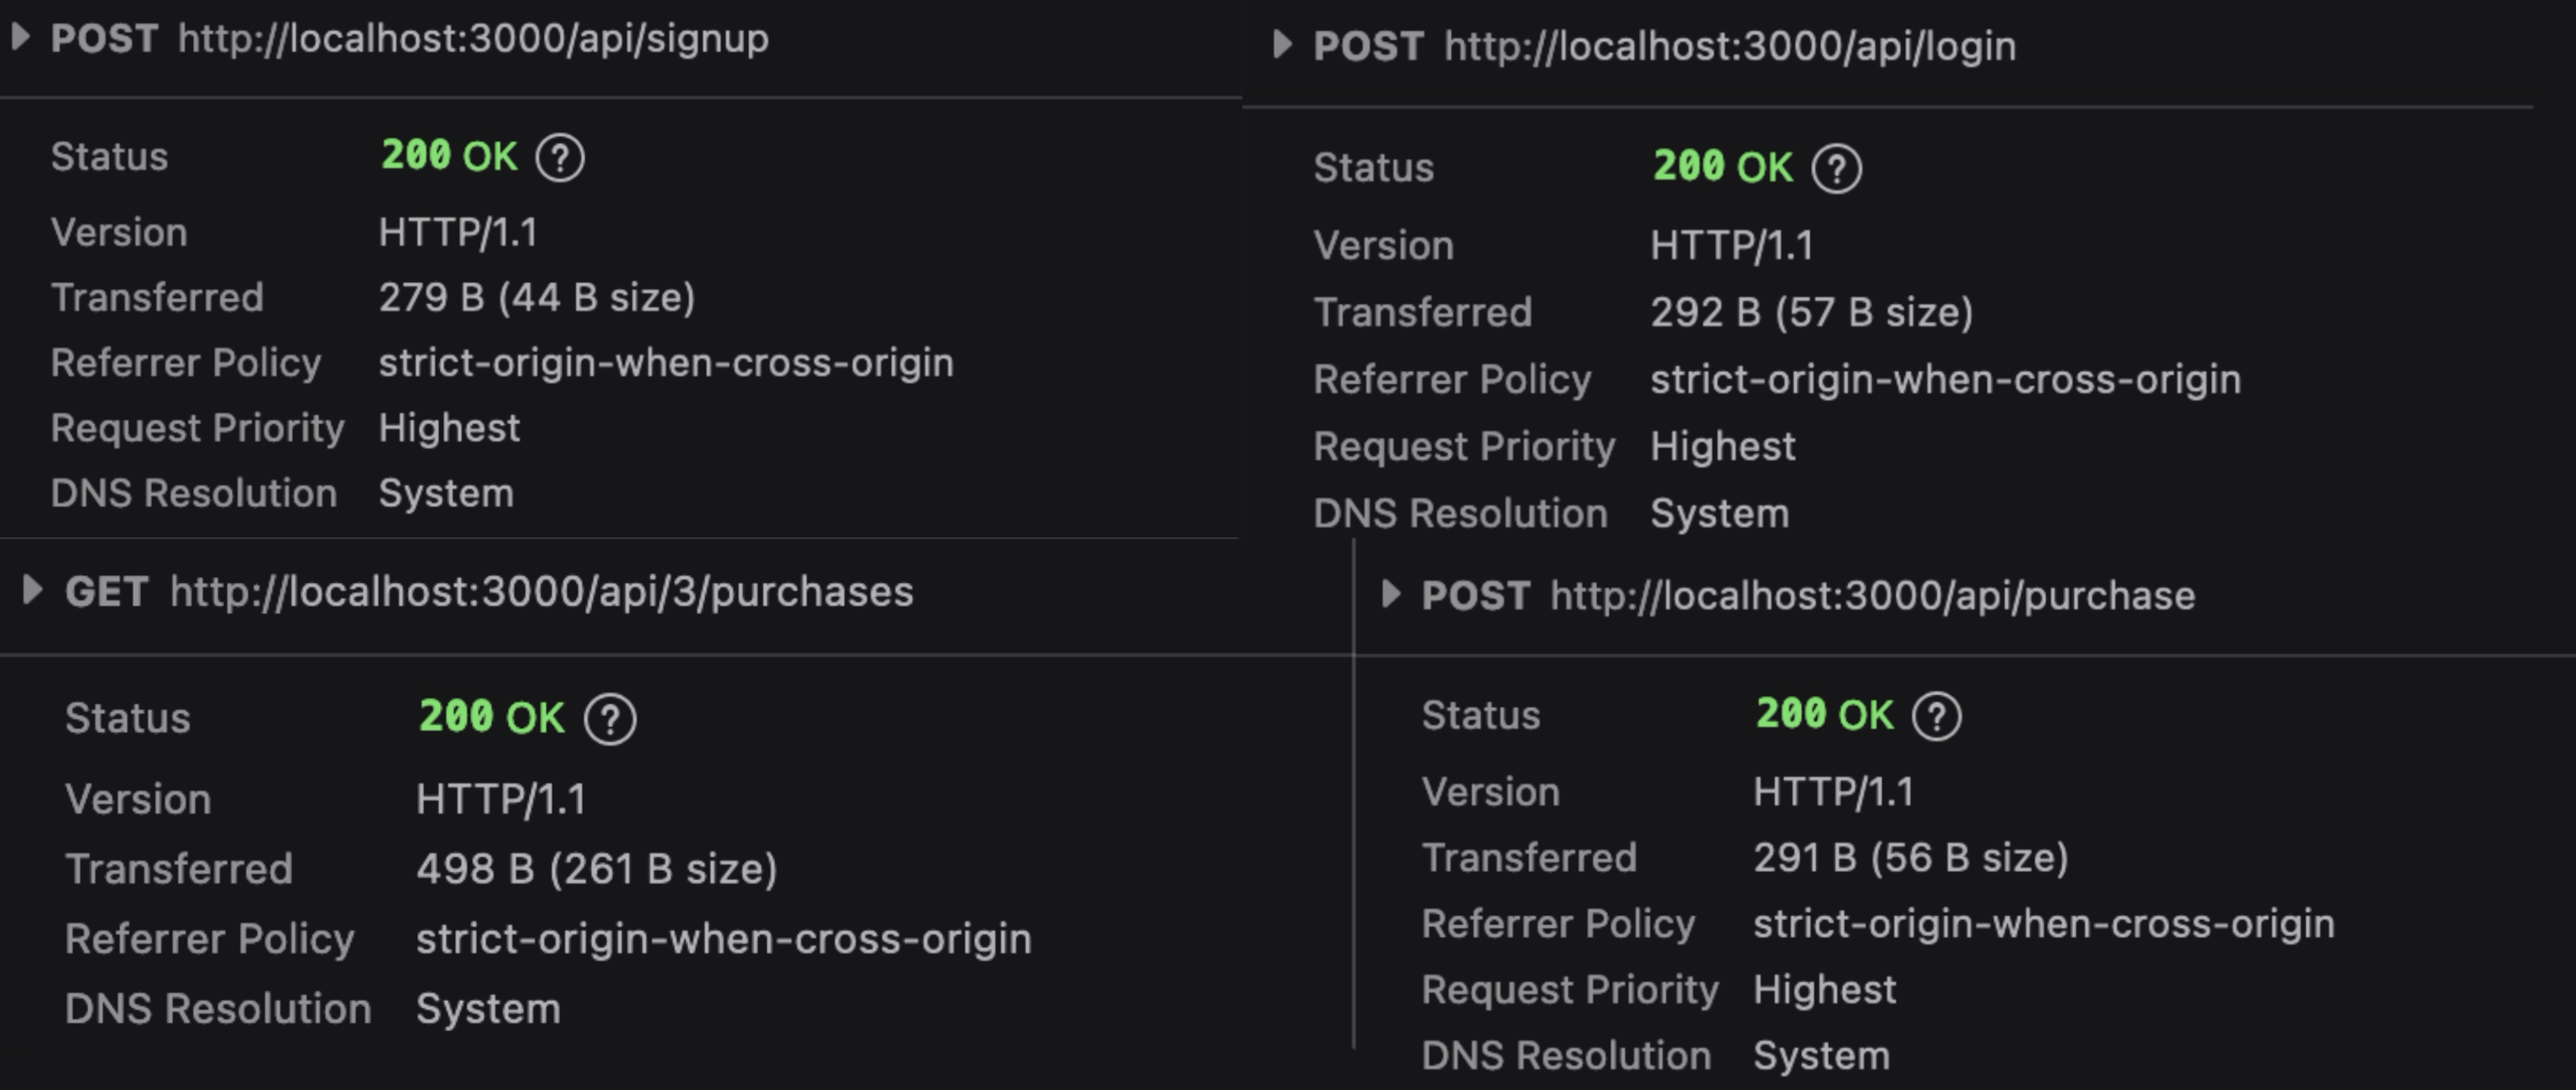
And that's a basic watered down version of Server Side JavaScript. You can see all the POSTS and GETS from the images below:

One thing that'll you find depressing is that many other languages can do the exact same thing (Python, Java, PHP, Go) so why on earth would someone learn Node.js? Well it's in higher demand plus it makes developer's more money. This is because it technically scales a bit better which makes the website run a bit faster.